
Main Courses
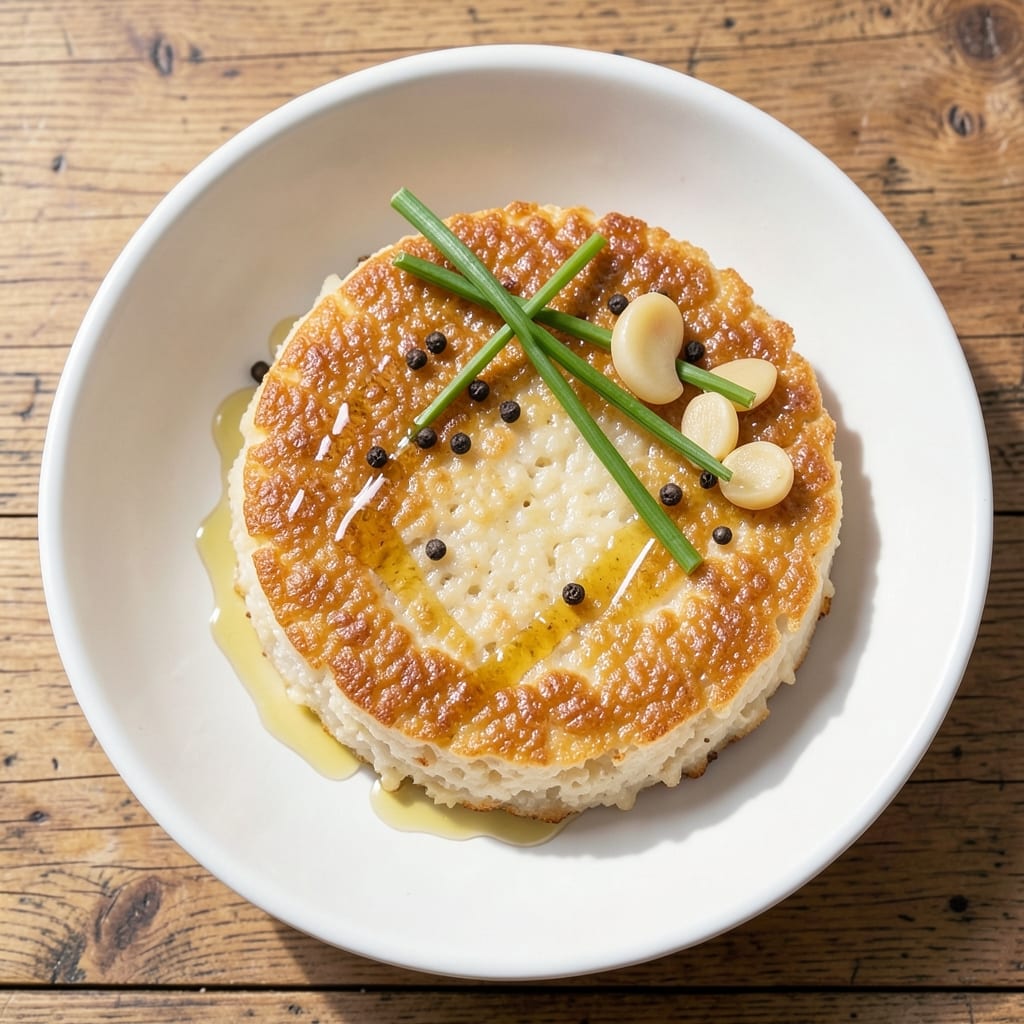
This American rice cake recipe delivers crispy-crusted comfort with a satisfying crunch and tender interior—perfect for snacking or pairing with savory dinners. The secret lies in the precise ratio of rice flour and water, steamed just enough to create that signature texture while maintaining a light, airy bite. Unlike store-bought versions, this homemade method ensures you control the crispiness and flavor, whether you stick with classic salted simplicity or experiment with herbs and spices.
The process is straightforward: mix, steam, and crisp, resulting in a dish that’s both nostalgic and refined. Each cake holds its shape beautifully, making it ideal for serving at gatherings or as a light yet satisfying side. With just 15 minutes of active prep and 30 minutes of steaming time, you’ll have a batch ready to enjoy—crispy on the outside, tender within, and packed with that comforting, familiar taste of home.
Ingredients for american rice cake
Twelve simple ingredients transform into nostalgic, crispy rice cakes with a savory heart.
| Ingredient | Amount | Notes |
|---|---|---|
| Rice Flour 🍚 | 2 cups | Finely milled for smooth texture |
| Water 💧 | 1 ½ cups | Room temperature preferred |
| Salt 🧂 | 1 ½ tsp | Diamond Crystal preferred |
| Vegetable Oil 🫒 | ¼ cup | For crisping, high smoke point |
| Butter 🧈 | 2 tbsp | Unsalted, melted for filling |
| Garlic Cloves 🧄 | 3 cloves | Minced for savory filling |
| Fresh Parsley 🌿 | ¼ cup | Chopped, for garnish |
| Black Pepper 🌶️ | ½ tsp | Freshly ground for heat |
| Dried Thyme 🌿 | ½ tsp | Or 1 tbsp fresh thyme |
| Onion Powder 🧅 | ½ tsp | For savory depth |
| Cornstarch 🌾 | 1 tbsp | For extra crispiness |
| Sesame Seeds 🌰 | 1 tbsp | Optional, for garnish |
Rice flour is the star—Bob's Red Mill or King Arthur brands work best for that signature texture. Check the label for 100% pure rice flour; blends with other grains can alter the result. The water should be room temperature to avoid lumps, and Diamond Crystal kosher salt dissolves better than table salt. For the filling, unsalted butter ensures you control the seasoning. Fresh herbs like parsley and thyme elevate the flavor, but dried work in a pinch if you're short on time.
No rice flour? Glutinous rice flour is a close substitute, though the texture will differ slightly. Short on butter? Olive oil or coconut oil works just as well for the filling. The sesame seeds are optional but add a nice crunch—Trader Joe's has them pre-toasted, which saves time. For extra crispiness, try adding 1/4 tsp baking powder to the rice flour mix. The garlic and onion powder can be swapped for 1 tbsp minced shallots if you prefer a milder flavor.
Store the rice cakes in an airtight container at room temperature for up to 3 days—they lose crispiness fast, so reheat in a 350°F oven for 5 minutes to restore that satisfying crunch. Freeze extras for up to 1 month by wrapping individually in parchment paper. The filling can be prepped ahead and kept in the fridge for 2 days, making assembly quick when you're ready to steam.
Why You'll Love This Recipe
- Here’s what sold me: that golden, shatteringly crispy shell with a pillowy center. The butter melts into the rice flour batter while frying, giving it a richness you’d never guess from the ingredients. It’s the kind of texture that makes you forget it’s a rice cake.
- Five-Ingredient Magic: I swear by this list—just rice flour, water, salt, a splash of oil, and butter. That’s it. No fancy pantry raids, no last-minute grocery runs. My pantry always has these staples, so I’m never stuck without something to make.
- Buttery Crispy Edge: Here’s what sold me: that golden, shatteringly crispy shell with a pillowy center. The butter melts into the rice flour batter while frying, giving it a richness you’d never guess from the ingredients. It’s the kind of texture that makes you forget it’s a rice cake.
- Lunchbox Hero: Between us, these are my kids’ favorite thing to pack for school. They’re sturdy enough to handle a backpack, stay fresh for days, and—honestly—they actually eat them. I’ve seen them swap PB&J for these without a fight. (Yes, even on a Tuesday.)
Step-by-step instructions for crispy-crusted rice cakes
Here's how to create golden, shatteringly crisp rice cakes with a savory garlic-herb filling.
Create the Rice Cake Batter
In a large mixing bowl, combine the 2 cups rice flour, 1.5 cups water, and 1.5 tsp salt. Use a whisk to stir vigorously for 2-3 minutes until you achieve a smooth, lump-free batter. The consistency should be similar to heavy cream—thick enough to coat the back of a spoon but still pourable. I like to press my finger into the batter; it should leave a slight indentation that fills back in slowly.
For extra crispiness, sift in the 1 tbsp cornstarch and mix it thoroughly into the batter. This creates a delicate, almost papery texture on the outside while keeping the interior tender. Let the batter rest for 10 minutes at room temperature—this helps the starches hydrate evenly and prevents cracking during cooking.
Prepare the Savory Filling
In a small saucepan, melt the 2 tbsp butter over low heat. Add the 3 minced garlic cloves and cook for 30 seconds just until fragrant—don't let it brown or it'll turn bitter. Remove from heat and stir in the 0.5 tsp onion powder, 0.5 tsp dried thyme, and 0.5 tsp black pepper. Let this mixture cool completely before using.
While the filling cools, finely chop the 0.25 cup fresh parsley and set aside. The parsley adds a bright, fresh contrast to the rich garlic-herb filling. I find that using a microplane for the garlic gives the best flavor distribution throughout the filling without overpowering the delicate rice cakes.
Assemble and Cook the Rice Cakes
Heat 0.25 cup vegetable oil in a nonstick skillet over medium-high heat until it shimmers but doesn't smoke. Using a small ladle or spoon, carefully drop 1-tablespoon portions of the rice cake batter into the hot oil. Space them about 1 inch apart—they'll expand slightly as they cook.
Cook for 2-3 minutes per side until the rice cakes develop a deep golden brown color and begin to puff slightly at the edges. The interior should still appear slightly undercooked—this is normal. As each cake is ready, remove it with a slotted spoon and drain on a paper towel-lined plate. The oil temperature is critical here; if it's too cool, the cakes will absorb oil and become greasy.
Fill and Garnish
Once all rice cakes have cooked, let them cool for 2 minutes to firm up slightly. Using a small spoon, carefully pierce each cake with the tip of a knife and insert ½ teaspoon of the garlic-herb filling. Press gently to ensure it stays inside. The cakes should be warm but not hot to the touch—this prevents them from becoming soggy when filled.
Sprinkle each filled rice cake with a pinch of the chopped parsley and, if using, a few sesame seeds for garnish. The seeds add a subtle nutty crunch that contrasts beautifully with the crisp exterior and tender interior. Serve immediately while still warm for that satisfying crunch and perfect texture contrast.
Pro Tips For Making American Rice Cake
- STEAM DON’T BOIL: These aren’t dumplings—if you drop them in boiling water, they’ll turn gummy. Bring a pot of water to a gentle simmer (tiny bubbles, just breaking the surface) and lower them in with a slotted spoon. I learned this the hard way after making a batch that dissolved into sad, gluey blobs.
- SIFT THE FLOUR FIRST: Rice flour is stubborn. Lump-free batter is non-negotiable here. Sift it directly into your mixing bowl with the salt, then whisk in water gradually—no more than 1 tablespoon at a time—until you hit a thick, pourable consistency. Skipping this step means chewy, uneven cakes.
- CHILL THE BATTER: Sounds weird, but it works: Let the batter sit in the fridge for 10–15 minutes before shaping. The cold slows gluten formation (yes, rice flour has some), so your cakes hold together better when steaming. I was skeptical until I tried it—now I never skip it.
- USE BUTTER LAST: Swirl in the cold butter at the very end, just before shaping. Warm butter melts into the batter too fast, making the cakes greasy and uneven. Cut it into tiny cubes, fold them in gently, and keep the dough cold until you’re ready to cook—your future self will thank you.
Make-ahead tips for american rice cake
Batter Prep Ahead
Make the rice cake batter 24 hours ahead and store it in an airtight container in the refrigerator. The starches hydrate more evenly overnight, creating a smoother texture. When ready to cook, let it sit at room temperature for 30 minutes before using—this prevents cracking during frying. I always double the recipe and prep the batter first thing in the morning so it’s ready for an afternoon snack session. 🌟
Filling Prep Strategy
Prepare the garlic-herb filling in advance and store it in a small jar in the fridge for up to 2 days. This saves time on cooking day and ensures consistent flavor in every bite. When reheating, warm the filling in the microwave for 20 seconds—just enough to soften the butter without losing its aromatic punch. I like to make a big batch and use it for rice cakes, dumplings, or even as a spread for toast. 🧄
Batch Cooking Tips
For large gatherings, cook the rice cakes in two batches to maintain oil temperature. Keep the cooked cakes warm in a 200°F oven on a wire rack—this prevents sogginess. If you’re short on time, use a deep fryer set to 375°F for 1 minute per side—it cooks faster and more evenly than a skillet. Just be sure to drain them on a rack, not paper towels, to keep them crisp. ⚡
Freezing for Later
Freeze unfilled rice cakes between parchment paper layers in a ziplock bag for up to 1 month. When ready to use, thaw at room temperature for 15 minutes, then reheat in a 350°F oven for 5 minutes to restore crispiness. Fill and garnish immediately after reheating—this keeps the texture perfect. I always freeze extras because they’re perfect for quick snacks when I’m in a rush. ❄️
Reheating Perfection
To revive stale rice cakes, place them on a baking sheet and bake at 375°F for 3-4 minutes until golden and crisp again. For a quicker fix, use the air fryer at 375°F for 2 minutes—it’s my go-to method for a fast, crispy result. Avoid microwaving; it turns them rubbery. The key is high heat and minimal time to restore that satisfying crunch. 🔥
Nutrition facts
Frequently asked questions
Can I make these rice cakes without a deep fryer or skillet?
Yes! Try the oven method for a healthier approach: brush 1-tablespoon portions of batter onto a parchment-lined baking sheet and bake at 425°F for 12-15 minutes until golden and crisp. For extra crunch, spray with oil before baking. The texture will be slightly different but still delicious.
Why are my rice cakes cracking or falling apart?
Cracking usually happens when the batter is too thick or the oil isn't hot enough. For perfect texture, whisk the batter until it's smooth like heavy cream and let it rest for 10 minutes before cooking. Also, ensure your oil reaches medium-high heat—it should shimmer but not smoke. If they fall apart, try adding 1 extra tablespoon of cornstarch to the batter.
What are some creative ways to use these rice cakes?
Beyond snacking, try using them as crunchy croutons in soups or salads, or as a base for mini sandwiches with fillings like cream cheese and smoked salmon. For a sweet twist, fill them with Nutella and crushed pistachios, or use them as crackers for dips like hummus or salsa. The possibilities are endless!
Can I substitute rice flour with another type of flour?
Rice flour is essential for that signature texture, but you can try glutinous rice flour (like sweet rice flour) for a chewier result. If you must use another flour, a 50/50 blend of rice flour and cornstarch works best, though the texture will be slightly less crisp. Avoid all-purpose flour—it won’t give the same delicate, airy bite.
How do I make these rice cakes gluten-free?
This recipe is already naturally gluten-free since it uses 100% rice flour. Just ensure all other ingredients—like cornstarch and sesame seeds—are certified gluten-free. Double-check labels on spices and oils to avoid cross-contamination. The texture remains perfectly crisp and satisfying.