
Main Courses
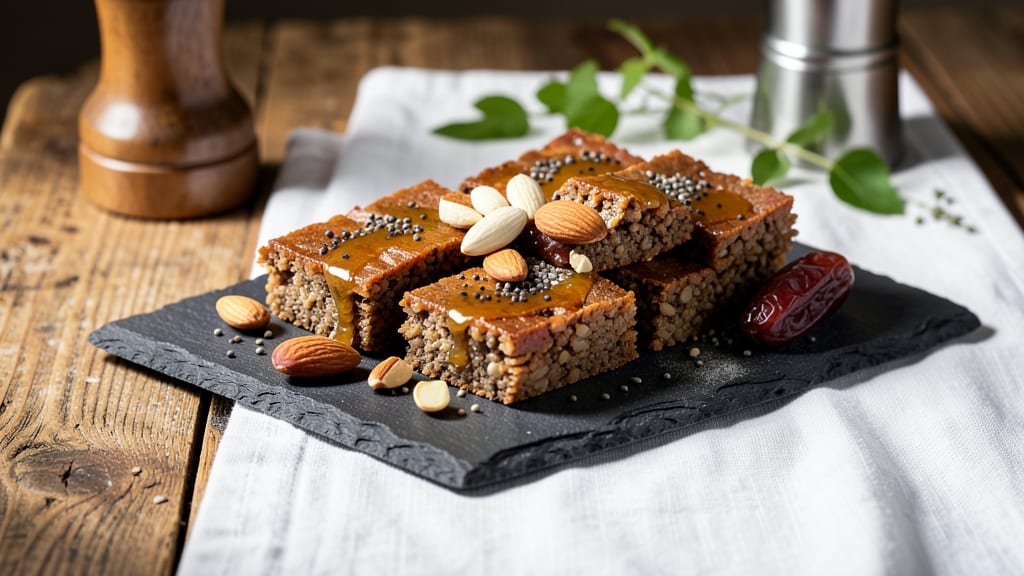
This brown rice energy bars recipe delivers wholesome fuel packed with protein, fiber, and natural sweetness—perfect for pre-workouts, post-hikes, or busy mornings. 💛 The secret lies in blending brown rice with nuts, seeds, and a touch of maple syrup to create bars that are chewy, satisfying, and free from refined sugar or artificial ingredients.
With just 10 minutes of prep and 20 minutes in the oven (or no baking at all for a no-bake version), these energy bars are a game-changer for meal prep.
The brown rice provides slow-release energy, while almonds, chia seeds, and dates add crunch, texture, and natural sweetness—no guilt, just great taste. Store them for up to 5 days or freeze for longer shelf life.
Ingredients for brown rice energy bars
Twelve wholesome ingredients blend into nutrient-dense bars perfect for sustained energy.
| Ingredient | Amount | Notes |
|---|---|---|
| Brown Rice, Uncooked 🌾 | 1 ½ cups | Short-grain preferred for chewiness |
| Raw Almonds 🥜 | 1 cup | Skin-on for texture, toasted lightly |
| Chia Seeds 🌱 | ½ cup | Organic for purity, no grinding |
| Pitted Dates 🍯 | 1 cup | Medjool preferred, chopped finely |
| Maple Syrup 🍯 | ½ cup | Grade B for robust flavor |
| Ground Flaxseed 🌿 | ¼ cup | Freshly ground for omega-3s |
| Vanilla Extract 🌸 | 1 tsp | Pure alcohol-free preferred |
| Cinnamon Powder 🌶️ | 1 tsp | Ceylon preferred for mild sweetness |
| Sea Salt 🧂 | ½ tsp | Fine grain for even distribution |
| Coconut Oil, Melted 🥥 | ¼ cup | Unrefined for flavor, not refined |
| Sunflower Seeds 🌻 | ½ cup | Shell-free for convenience |
| Cocoa Powder 🍫 | ¼ cup | Unsweetened, Dutch-processed |
The brown rice is the foundation—short-grain varieties like sushi rice create that satisfying chew. Most grocery stores carry it in the baking aisle, but Whole Foods or Trader Joe's offer higher-quality options with minimal additives. For the chia seeds, organic brands like Bob's Red Mill or Navitas Organics ensure purity without gritty texture. Medjool dates are worth the splurge at specialty markets—their caramel-like sweetness elevates the bars. Maple syrup should be Grade B for that robust, earthy depth; Whole Foods or local farm stands often carry it in bulk.
No almonds? Cashews or walnuts work equally well—just adjust the quantity to maintain texture. Sunflower seeds can be swapped for pumpkin seeds, though flavor differs slightly. Cocoa powder is non-negotiable for that rich undertone, but if unavailable, carob powder offers a milder alternative. Coconut oil must be unrefined—refined versions lack the subtle coconut aroma. For the vanilla extract, alcohol-free versions (like Frontier Co-op) prevent bitterness. Cinnamon can be omitted entirely if you prefer a neutral spice profile, but it enhances the sweetness beautifully.
Store these bars in an airtight container at room temperature for up to 5 days, or freeze for 3 months to preserve freshness. The chia seeds will thicken the mixture—this is ideal for binding. For a no-bake version, simply press the mixture into a lined pan and refrigerate for 2 hours. Portion into single-serving bars for easy grab-and-go energy. The coconut oil will solidify as it cools, adding to the texture—no need to refrigerate unless storing long-term.
Why You'll Love This Recipe
- No-Fuss Mixing: I swear, this comes together in one bowl—no fancy equipment, no stress. Just pulse the brown rice and almonds in a food processor, toss in the dates and chia seeds, drizzle on the maple syrup, and press. That’s it. (Yes, even on a Tuesday night.)
- Sweet-Savory Crunch: The dates give it that caramel-like chew, while the toasted almonds add a buttery crunch. Honestly, the maple syrup ties it all together—rich but not cloying, with just enough depth to make it feel like a treat, not just a snack.
- Snack for Everyone: These are my go-to for gym bags, kids’ lunches, or when I need a quick desk snack. Between us, they’re sturdy enough to survive a backpack but still melt in your mouth—no soggy bits, no fuss. (My daughter picks out the almonds first, but still asks for seconds.)
- Budget-Friendly Staples: I use what’s already in my pantry—brown rice, chia seeds, and almonds last forever, and dates are cheaper than most energy bars. Plus, they keep for weeks in the fridge, so I’m not scrambling for last-minute grocery runs. Solid.
Step-by-step instructions for brown rice energy bars
Here's how to craft these nutrient-dense bars with perfect texture and flavor balance.
👨🍳 Step 1: Toast the Nuts and Seeds for Depth
Preheat your oven to 325°F and spread the 1 cup raw almonds and 0.5 cup sunflower seeds on a rimmed baking sheet in a single layer. Toast for 8-10 minutes until they release an intoxicating nutty aroma and develop a light golden color. Stir halfway through to ensure even browning.
This step transforms bland nuts into flavorful components. Watch closely—they'll darken quickly once they start to brown. Let them cool completely before processing to avoid releasing excess oils that could make your bars greasy. I like to spread them on parchment paper for easy cleanup.
🍳 Step 2: Cook the Brown Rice for Texture
In a small pot, combine the 1.5 cups brown rice, uncooked with 2.5 cups water (or the amount specified on your rice package). Bring to a boil, then reduce heat to medium-low and simmer for 30 minutes until the rice is tender and all liquid is absorbed. Fluff with a fork and let cool completely.
The rice should be cool enough to handle when you're ready to mix it with other ingredients. If you rush this step, the steam from warm rice will create condensation in your bars, making them soggy. I find spreading the rice on a baking sheet to cool faster helps maintain the perfect texture.
🥘 Step 3: Process the Base Mixture
In a food processor, combine the cooled brown rice, toasted nuts and seeds, 0.5 cup chia seeds, 0.25 cup ground flaxseed, 1 tsp cinnamon powder, and 0.5 tsp sea salt. Pulse until everything is finely chopped but not powdery—you want a coarse texture that still holds together. Transfer to a large mixing bowl.
This is where the structural foundation forms. I like to scrape down the sides of the processor to ensure even distribution of all ingredients. The chia and flaxseeds will add that signature chewiness while the cinnamon and salt create flavor bridges between components.
🍳 Step 4: Combine Wet Ingredients for Binding
In a separate bowl, whisk together the 0.5 cup maple syrup, 0.25 cup melted coconut oil, 1 tsp vanilla extract, and 0.25 cup cocoa powder until smooth. Pour this mixture into the dry ingredients and stir vigorously for 2-3 minutes until everything is thoroughly combined and the mixture holds together when pressed.
This is the moment that matters: the wet ingredients should transform the dry mixture into a cohesive dough. If it's too crumbly, add 1 tablespoon water at a time until it comes together. If it's too sticky, fold in 1 tablespoon more ground flaxseed to absorb moisture. The dough should be soft but not wet.
🥘 Step 5: Add Dates and Press into Pan
Fold in the 1 cup pitted dates, chopped finely, using a silicone spatula. The dates should be evenly distributed throughout the mixture. Press the dough firmly into a 9x13-inch baking pan lined with parchment paper, using the back of a spoon to create an even, compact layer. Smooth the top with your fingers or a spatula.
Here's the thing—don't overwork the dough as you press it. You want it to hold together but still maintain some texture. I like to press firmly but not aggressively to avoid compressing the dates into a paste. Once pressed, refrigerate for 30 minutes to firm up before cutting.
🔪 Step 6: Chill and Cut for Perfect Bars
After chilling, remove the pan from the refrigerator and cut into 12 equal bars using a sharp knife. For clean cuts, dip the knife in hot water between each cut. Wrap individually in parchment paper or store in an airtight container in the refrigerator for up to 1 week or freezer for up to 3 months.
These bars will hold their shape beautifully when properly chilled. If they crumble when cutting, return them to the refrigerator for another 10 minutes to firm up. The texture should be chewy from the rice and dates, with a satisfying crunch from the toasted nuts and seeds throughout each bite.
Pro Tips For Making Brown Rice Energy Bars
- TOAST THE RICE: Brown rice straight from the bag is too hard to blend into a smooth base—toss it in a dry skillet over medium heat for 5 minutes until it smells nutty and fragrant. I learned this the hard way after ending up with a gritty, unsatisfying paste that tasted like raw rice cereal.
- PIT THOSE DATES: Skip the pitting step, and you’ll spend 10 minutes picking out seeds mid-blend. Use a sharp knife to slice dates lengthwise, then press out the pits with your thumb—no fancy tools needed. (Yes, even if you’re impatient like me.)
- CHIA SEEDS FIRST: Mix chia seeds into the wet ingredients before adding the dry base. They’ll soak up liquid immediately, ensuring even distribution and preventing clumps. I was skeptical until I tried it—now I can’t imagine doing it any other way.
- PRESS HARDER THAN YOU THINK: The bars won’t set properly if you just tap the mixture into the pan. Press firmly with a greased spatula or your hands (oiled for easy release) to compact the layers. This isn’t the prettiest method, but it’s the only way to get bars that hold together after slicing.
Troubleshooting this recipe
Sticky Mixture Fix
If your dough becomes too sticky after adding wet ingredients, don't panic—this happens when the rice absorbs too much moisture. Add 1 tablespoon ground flaxseed at a time, mixing well after each addition. The flaxseed acts like a natural binder, absorbing excess moisture without altering flavor.
I've found this works better than extra nuts, which can make the bars too dense. For extra insurance, chill the dough for 10 minutes before pressing into the pan. 💡
Crumbly Texture Issues
Crumbly bars usually mean the mixture didn't bind properly. First, check if you used enough wet ingredients—try adding 1 teaspoon more maple syrup or melted coconut oil. If that doesn't help, blend the dry ingredients again in the food processor for 10-15 seconds to break up any large clumps.
For stubborn cases, fold in 1 tablespoon chia seeds to improve cohesion. The key is patience—let the dough rest for 5 minutes before pressing. 🌾
Soggy Bars After Cutting
Soggy bars typically result from condensation during cooling. To prevent this, ensure your brown rice is completely cooled before mixing, and avoid pressing the dough too firmly into the pan.
If you notice moisture on the surface after chilling, place the pan in the freezer for 15 minutes to firm everything up. For extra protection, store bars in an airtight container with a paper towel on top to absorb any excess moisture. 🥥
Uneven Texture
Uneven texture often happens when ingredients aren't evenly distributed. Pulse the nuts and seeds in the food processor until they're uniformly chopped—this prevents pockets of crunchiness. For the dates, chop them finely and fold them in thoroughly. If you see dry spots, add 1 teaspoon water and mix well.
Press the dough evenly into the pan using a spatula for consistent texture. A light tap on the pan before cutting helps release clean bars. ✨
Bars Not Holding Shape
If your bars fall apart when cutting, they need more binding. The most effective fix is to add 1-2 tablespoons more ground flaxseed to the mixture and press again. For a quick solution, press the dough into the pan, then refrigerate for 30 minutes before cutting.
If you're in a hurry, freeze the pressed dough for 10 minutes to firm it up. The extra chilling time helps the ingredients set properly. 🧊
Flavor Too Mild
If your bars lack depth, boost the flavor with an extra ½ teaspoon cinnamon or ¼ teaspoon vanilla extract. For a richer taste, add 1 tablespoon cocoa powder or a pinch of sea salt to enhance sweetness.
Toasting the nuts and seeds for an extra 2 minutes deepens their flavor significantly. A final drizzle of melted chocolate or a sprinkle of flaky salt before chilling adds a gourmet touch. 🍫
Nutrition facts
Frequently asked questions
Can I make these energy bars without a food processor?
If you don't have a food processor, simply chop the nuts and seeds finely with a knife or pulse them in a blender until they resemble coarse sand. For the brown rice, cook it until very tender (almost mushy) to help bind the ingredients. The texture will be slightly less uniform, but still delicious and functional.
How do I make these bars gluten-free?
This recipe is already naturally gluten-free since it uses brown rice, nuts, seeds, and dates. Just ensure your ingredients are certified gluten-free—especially the brown rice, chia seeds, and cocoa powder. Double-check labels on maple syrup and vanilla extract too, as some brands may contain hidden gluten.
Can I substitute dates for another sweetener?
Yes, but texture may change. For a vegan option, try 1 cup unsweetened applesauce or ½ cup mashed banana (adds moisture) or ½ cup tahini + 2 tbsp maple syrup (for richness). For a non-vegan option, use ½ cup honey or ½ cup peanut butter. Dates provide natural binding and chewiness that other sweeteners can't replicate.
Why do my bars taste bland?
Bland flavor usually means insufficient binding or lack of depth. Boost flavor by adding ½ teaspoon more cinnamon or ¼ teaspoon sea salt. For extra richness, toast the nuts and seeds for 2 extra minutes or add 1 tablespoon cocoa powder. A final drizzle of melted chocolate or sprinkle of flaky salt before chilling elevates the taste significantly.
How do I store these bars for maximum freshness?
Store in an airtight container at room temperature for up to 5 days, or refrigerate for 1 week to maintain chewiness. For longer storage, freeze for up to 3 months. To prevent sogginess, place a paper towel on top before sealing. Thaw frozen bars at room temperature for 1 hour before eating.