
Main Courses
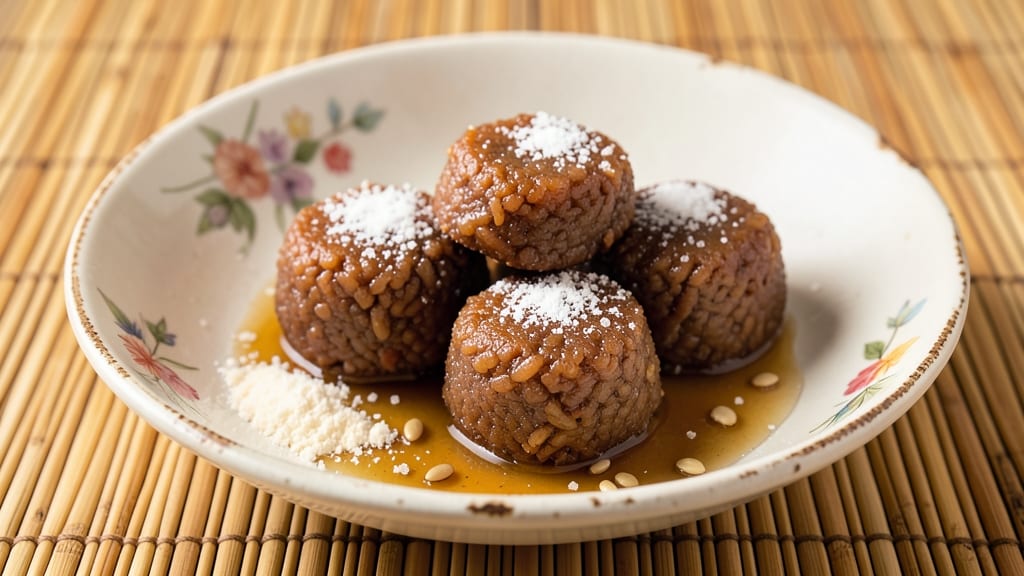
This brown rice mochi recipe transforms simple ingredients into delicate, chewy sweets with a satisfying snap—perfect for both traditional celebrations and modern snacking. The process begins with cooking nutty brown rice until tender, then blending it into a smooth paste that forms the heart of these pillowy treats.
What makes this version special is its vegan-friendly nature while maintaining authentic texture and flavor, a nod to Japanese mochi traditions without compromise.
The magic lies in the balance of sweetness and the glutinous rice flour that gives mochi its signature chewy-yet-firm bite. Once shaped and steamed or grilled, these mochi develop a subtle caramelized edge that contrasts beautifully with fillings like red bean paste or fresh fruit.
Whether served at gatherings or enjoyed as a solo treat, each bite delivers that perfect harmony of texture and sweetness—making it a recipe worth mastering for any occasion.
Ingredients for brown rice mochi
Twelve ingredients transform into twelve perfect mochi—vegan, chewy, and bursting with traditional flavor.
| Ingredient | Amount | Notes |
|---|---|---|
| Short-Grain Brown Rice 🌾 | 1 ½ cups | Rinsed thoroughly before cooking |
| Glutinous Rice Flour (Mochiko) 🍚 | 2 cups | High-quality mochiko preferred |
| Granulated Sugar 🍚 | ¾ cup | Organic preferred for refined texture |
| Water 💧 | 1 ¼ cups | Filtered or spring water ideal |
| Vegetable Oil 🫒 | 1 tbsp | Lightly toasted for aroma |
| Kuzu (Kudzu Flour) 🌿 | 1 tbsp | For traditional chewiness |
| Red Bean Paste (Anko) 🍫 | 1 ½ cups | Store-bought or homemade |
| Matcha Powder 🍵 | 1 tbsp | Ceremonial grade preferred |
| Agave Nectar 🍯 | 2 tbsp | For binding and sweetness |
| Fresh Lemon Juice 🍋 | 1 tbsp | Brightens final flavor |
| Sea Salt 🧂 | ½ tsp | Fine grain for delicate seasoning |
| Cornstarch 🌾 | 1 tbsp | For dusting and shaping |
The short-grain brown rice is the foundation—look for japonica varieties at specialty Asian markets for optimal stickiness. Nishiki Market in LA or H Mart carry excellent options, or use Lundberg Family Farms organic brown rice as a reliable alternative. The glutinous rice flour (mochiko) must be 100% pure—brands like Koyo or Shin-Ei guarantee authentic texture. If substituting, ensure it's labeled for mochi-making; regular rice flour lacks the necessary elasticity. Toast the flour lightly in a dry pan before mixing to enhance its nutty aroma, a professional technique that elevates the final product.
No kuzu flour? Arrowroot powder works in a pinch, though the texture will be slightly less resilient. The red bean paste can be swapped for black sesame paste or mango purée for variety, but adjust sweetness accordingly—store-bought anko often contains added sugar, so taste before using. Matcha powder should be ceremonial grade (like Ippodo Tea) for vibrant color and flavor; culinary-grade will taste bitter. The agave nectar binds the mixture while adding subtle sweetness—avoid honey to maintain vegan integrity. For shaping, cornstarch is non-negotiable; it prevents sticking and adds a delicate crunch when dusted between layers.
Store uncooked mochi dough in an airtight container with parchment paper between layers for up to 5 days in the fridge or 3 months frozen. Once shaped, steam or grill immediately for best texture—pre-cooked mochi loses its chew after 24 hours. For fillings, red bean paste keeps 2 weeks refrigerated or 6 months frozen, while matcha-infused dough stays fresh 3 days before turning bitter. Portion dough into 1-ounce balls before cooking for consistent results—this recipe yields 12 standard mochi, perfect for sharing or freezing in single-serving portions.
Why You'll Love This Recipe
- No-Fuss Ingredients: I keep a bag of brown rice and mochiko flour in my pantry—no specialty shopping. The recipe uses pantry basics, and honestly, the texture comes from the ratio of rice to flour, not some obscure ingredient.
- Chewy Yet Light: That perfect balance of nutty brown rice and pillowy mochiko? It’s like a hug in your mouth. The sugar caramelizes just enough to make it irresistible without being cloying—think crispy edges with a soft, almost jelly-like center.
- Meal Prep Gold: I make a big batch on Sundays and freeze half. Reheated in a steamer or air fryer, it’s still just as good—great for lunches or unexpected guests. (Yes, even on a Tuesday night.)
- Budget Magic: Brown rice is cheap, mochiko lasts forever, and you only need a little oil and sugar. I’ve fed my whole family (plus leftovers) for under $10—no guilt, just flavor. Plus, it’s way cheaper than store-bought mochi.
Step-by-step instructions for brown rice mochi
Mastering mochi texture requires precision and patience—these steps deliver authentic chewiness every time.
Cook the Short-Grain Brown Rice to Perfect Texture
Rinse the 1.5 cups short-grain brown rice thoroughly until the water runs clear, then drain well. In a medium saucepan, combine the rinsed rice with 1.25 cups water and bring to a boil over medium-high heat. Once boiling, reduce to low heat, cover tightly, and simmer for 30 minutes. The rice should absorb all the water and become tender but still retain a slight bite—this is crucial for the mochi's structure.
After cooking, let the rice cool completely before handling. I find spreading it on a tray helps speed up this process. The rice should be cool to the touch before proceeding, as warm rice makes the dough sticky and difficult to work with. This cooling step prevents gummy mochi and ensures proper gluten development in the next stage.
Create the Glutinous Rice Dough Foundation
In a large mixing bowl, combine the cooled rice with 2 cups glutinous rice flour (mochiko) and 0.75 cup granulated sugar. Add 1 tbsp vegetable oil and 1 tbsp kuzu (kudzu flour), then mix thoroughly using a silicone spatula. The kuzu acts as a natural thickener that enhances the mochi's signature chewiness—don't skip this ingredient.
Gradually add 2 tbsp agave nectar and 1 tbsp fresh lemon juice, mixing until a cohesive dough forms. The dough should be pliable but not sticky—if it's too dry, add 1 tsp water at a time until workable. This step is where the magic happens: the combination of glutinous rice and kuzu creates that signature elastic texture that traditional mochi is known for.
Incorporate Fillings and Shape the Mochi
Divide the dough into 12 equal portions (about 1.5 oz each) and flatten each into a disc. Place 1 tbsp red bean paste (anko) in the center of each disc, then gently wrap the dough around the filling, sealing the edges completely. The anko should be evenly distributed—don't overstuff, as this can cause the mochi to burst during cooking.
Roll each filled mochi into a 1-inch thick oval shape, then dust generously with 1 tbsp cornstarch on both sides. The cornstarch prevents sticking and creates that beautiful matte finish. I like to work quickly here—mochi dough loses moisture fast, so keep any unused dough covered with a damp towel to maintain pliability.
Steam to Achieve Perfect Texture
Set up a steamer with 1 inch of water in the base and bring to a rolling boil. Arrange the mochi on the steamer rack, leaving 1 inch between each piece. Cover and steam over medium-high heat for 12-15 minutes until the mochi are firm to the touch and the edges pull away cleanly from the steamer.
Here's the critical checkpoint: the mochi should be completely opaque with no translucent spots. If they're still slightly translucent, steam for another 2-3 minutes. The steam transforms the dough's structure, creating that signature chewy-yet-firm texture that separates great mochi from good mochi. Remove immediately after steaming to prevent overcooking.
Pro Tips For Making Brown Rice Mochi
- SOAK THE BROWN RICE LONGER: I learned this the hard way—rushing the soak leads to gummy mochi. Let the short-grain brown rice sit in water for at least 12 hours (or overnight), then rinse until the water runs clear. The extra time breaks down the starches so your mochi stays tender, not gluey.
- SIEVE THE MOCHIKO WET: Dry-sifting glutinous rice flour just makes a mess. Mix it with the sugar first, then sift it directly into a bowl with a splash of water (about 1/4 cup). This pre-hydrates the flour, cuts down on lumps, and saves you from scraping stubborn clumps off the sifter later.
- PRESS THE MOLD HARD: If your mochi looks dense but cracks when you cut it, you didn’t press hard enough. Use a clean, damp cloth over the mold and press down with steady pressure—not just a quick smash. Think of it like making a tight tamale: firm, even pressure every time.
- STEAM ON HIGH HEAT FIRST: Start with the lid off for the first 5 minutes on high heat to drive off excess moisture. Then add the lid and reduce to medium-low. This prevents a soggy, gummy center—my first batches were a disaster until I realized the steam needed to build gradually.
Flavor customization for this brown rice mochi
Sweetness Variations
For a less sweet profile, reduce granulated sugar to ½ cup and add 1 tsp vanilla extract to enhance depth. If you prefer caramelized sweetness, replace half the sugar with ½ cup brown sugar and toast it in a dry pan until fragrant before mixing.
For fruit-infused mochi, blend ½ cup mango purée with the agave nectar—this adds natural sweetness and vibrant color. 🍯
Flavor Infusions
Transform your mochi with matcha green tea by mixing 1 tbsp ceremonial-grade matcha directly into the dough.
For citrus lovers, add 1 tbsp finely grated lemon zest to the dough for a bright, zesty twist. Coconut mochi works beautifully by replacing ½ cup water with ½ cup coconut milk and adding 1 tsp coconut extract. These infusions elevate the base flavor without altering the texture.
Savory Mochi Twist
Skip the sugar entirely and replace it with 1 tbsp soy sauce and ½ tsp sesame oil for a savory umami version. Pair with fillings like pickled plum (umeboshi) or salted black sesame paste for a Japanese-inspired snack.
Dust finished mochi with toasted sesame seeds for extra crunch. This variation is perfect for tea pairings or as a savory appetizer. 🌿
Seasonal Fillings
Swap red bean paste for seasonal fruits: strawberry jam in summer, cranberry sauce in winter, or peach purée in late summer. For holiday mochi, use chestnut purée and dust with cinnamon sugar.
Each filling transforms the mochi's flavor profile while maintaining the signature chew. Store fillings separately until ready to assemble for freshness.
Texture Adjustments
For extra chewy mochi, increase kuzu flour to 2 tbsp—this intensifies the elastic bite. Need softer mochi? Reduce glutinous rice flour to 1.5 cups and add 1 extra tbsp water to the dough.
If your mochi turns out too dense, the issue is likely under-steaming; extend cook time by 2-3 minutes next time. These tweaks help troubleshoot texture issues without sacrificing flavor. ✨
Nutrition facts
Frequently asked questions
Can I make this brown rice mochi recipe without glutinous rice flour?
While traditional mochi requires glutinous rice flour (mochiko) for its signature chewiness, you can create a softer version by using 1.5 cups regular white rice flour plus 1 tbsp cornstarch as a substitute. The texture will be less elastic but still enjoyable. For best results, add an extra 1 tbsp kuzu flour to help with binding and chew.
How do I prevent my mochi from sticking during shaping?
Generously dust your work surface and hands with cornstarch before handling the dough. Keep unused portions covered with a damp towel to maintain pliability, and work in small batches. For extra insurance, chill the shaped mochi in the fridge for 10 minutes before steaming—this firms them up and reduces sticking during cooking.
What's the best way to store leftover brown rice mochi?
Store uncooked mochi dough in an airtight container with parchment paper between layers for up to 5 days in the fridge or 3 months frozen. Once cooked, keep mochi in the fridge for 3 days or freeze for 1 month. To reheat, steam for 2-3 minutes—this restores moisture without making them soggy.
Can I grill brown rice mochi instead of steaming?
Yes! Grilling creates delicious caramelized edges. Lightly oil the grill grates, then cook mochi over medium heat for 2-3 minutes per side until golden brown. For extra flavor, brush with a mix of 1 tbsp agave nectar and ½ tsp vanilla extract before grilling. This method works best with slightly firmer mochi that can handle direct heat.
Why did my mochi turn out gummy instead of chewy?
Gummy mochi usually results from overmixing the dough or insufficient steaming. Ensure your rice is completely cooled before mixing, and steam until fully opaque (no translucent spots). Also verify you used kuzu flour—this ingredient is crucial for proper texture. If the dough feels too sticky, reduce water by 1 tsp next time.