
Main Courses
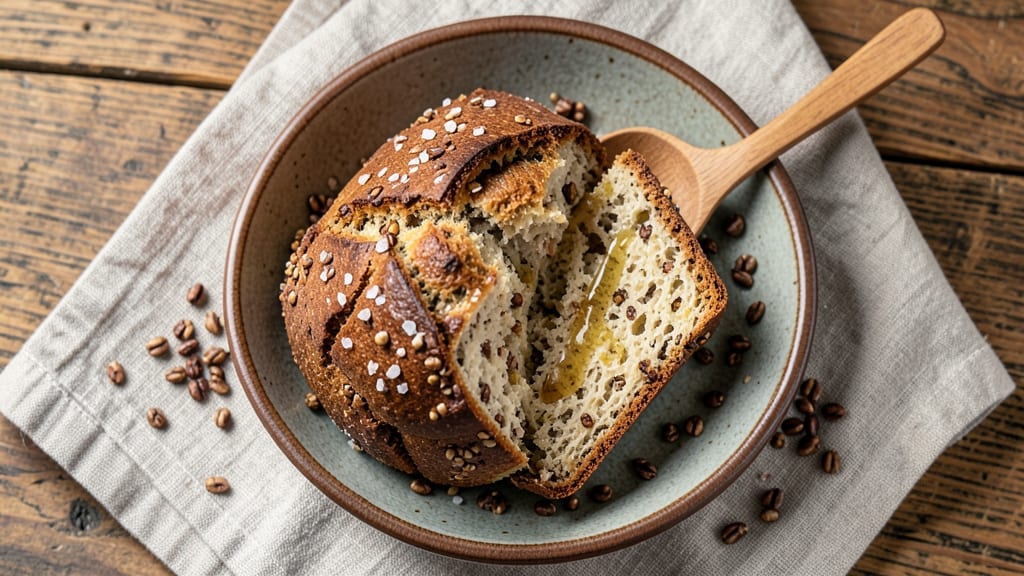
This buckwheat and rice flour bread delivers a nutty crunch with an unexpectedly lightweight texture—perfect for gluten-free diets. The blend of buckwheat's earthy depth and rice flour's mild sweetness creates a bread that's both hearty and delicate, with a subtle crunch from toasted buckwheat groats.
What makes this recipe stand out is its foolproof hydration technique, ensuring a tender crumb without compromising structure.
The result is a loaf with golden crust and moist interior, ideal for sandwiches or toast. With high protein and natural gluten-free properties, it’s a nutritious upgrade to traditional bread.
The recipe includes step-by-step fermentation guidance and baking tips to achieve the perfect balance of texture and flavor every time.
Ingredients for buckwheat and rice flour bread
Precision-milled flours and hydration secrets create a gluten-free loaf with golden crust and nutty crunch.
| Ingredient | Amount | Notes |
|---|---|---|
| Buckwheat Flour 🌾 | 2 cups | Lightly toasted for enhanced flavor |
| Rice Flour (White) 🌾 | 2 cups | Fine grind preferred for texture |
| Toasted Buckwheat Groats 🌾 | ½ cup | Lightly crushed for crunch |
| Active Dry Yeast 🍞 | 2 ¼ tsp | Instant yeast works too |
| Granulated Sugar 🍚 | 1 tbsp | Feeds yeast for fermentation |
| Sea Salt 🧂 | 1 ½ tsp | Diamond Crystal preferred |
| Extra-Virgin Olive Oil 🫒 | ½ cup | High-quality for flavor |
| Warm Water 💧 | 1 ½ cups | 110°F for yeast activation |
| Flaxseed Meal 🌱 | 1 tbsp | Mixed with 3 tbsp water for egg replacement |
| Apple Cider Vinegar 🍎 | 1 tsp | Enhances rise and flavor |
| Ground Flaxseed 🌱 | ½ tsp | Optional for added nutrition |
| Sesame Seeds 🌻 | 1 tbsp | For crust decoration |
The buckwheat flour is the star here—Bob's Red Mill or King Arthur brands provide consistent quality. Lightly toast the groats in a dry pan until fragrant (about 3 minutes) to deepen their nutty notes. Rice flour should be fine-milled for a tender crumb; avoid coarse versions. Yeast activation is critical: always use warm water (110°F) and let it foam for 5-10 minutes before mixing. For the flax egg, whisk the meal with water until gel-like—this mimics egg's binding properties perfectly. The vinegar isn't just for flavor; it helps gluten-free dough rise more effectively.
No buckwheat flour? Substitute with sorghum flour at 1:1 ratio, though texture will differ slightly. Rice flour substitutes include tapioca starch (1:1) or potato starch (1:1), but these yield denser bread. Skipping the groats reduces crunch but maintains the same flavor profile. For yeast-free versions, use 1.5 tsp baking soda + 1 tbsp vinegar instead. The sesame seeds can be swapped for poppy seeds or sunflower seeds if preferred. Always measure flours by weight for consistency—1 cup rice flour weighs ~4.5 oz, while buckwheat is slightly heavier (~5 oz per cup).
This dough requires 2 hours of cold fermentation for optimal texture—don't rush it. Shape the loaf gently to avoid overworking the gluten-free flour. Bake at 375°F for 40-45 minutes until internal temperature reaches 205°F. Cool completely on a wire rack before slicing to prevent gumminess. Store wrapped at room temperature for 3 days or freeze for 3 months. For reheating, wrap slices in foil and warm in a 350°F oven for 5-7 minutes—this restores the crust's crispness.
Why You'll Love This Recipe
- No-Knead Magic: I swear by this dough—just mix, let it rise, and you’re done. No stand mixer, no overworking, just a simple bowl and a little patience. The buckwheat groats add texture without the fuss, and the rice flour keeps it light.
- Earthy Crunch Twist: That nutty buckwheat flavor? It’s like a warm hug for your taste buds. The toasted groats give every bite a satisfying crunch, while the yeasty rise keeps it airy. Honestly, it’s the kind of bread that makes you forget it’s gluten-free.
- Meal Prep MVP: Slice it fresh, toast it later—this bread lasts forever in the fridge. Toss it in lunchboxes, pair it with soups, or freeze slices for quick toast on lazy mornings. Between us, I’ve had it for breakfast, dinner, and everything in between.
- Budget-Friendly Staple: Buckwheat and rice flour are cheap, and a single batch feeds my whole family. Leftovers? Even better. The sugar caramelizes just enough to keep it from drying out, so it stays fresh for days. My wallet—and my pantry—thank me.
Step-by-step instructions for buckwheat and rice flour bread
Here's the method for crafting a bread with nutty depth and an airy yet substantial texture.
Activate the Yeast and Prepare the Flax Egg
In a small bowl, combine the 1.5 cups warm water (test by touching—it should feel like bathwater, around 110°F), 1 tbsp granulated sugar, and 2.25 tsp active dry yeast. Let this mixture sit for 5-10 minutes until it becomes frothy and bubbly. This indicates the yeast is active and ready to work—if it doesn't bubble, your yeast may be dead or the water too hot.
In a separate small bowl, whisk together 1 tbsp flaxseed meal with 3 tbsp water to create a flax egg. Add 1 tsp apple cider vinegar and 0.5 tsp ground flaxseed, then set aside. This plant-based binder will replace eggs while adding subtle earthiness to the bread.
Mix the Dry Ingredients and Combine
In a large mixing bowl, whisk together the 2 cups buckwheat flour and 2 cups rice flour (white) until evenly combined. Add the 0.5 cup toasted buckwheat groats (lightly crushed) and 1.5 tsp sea salt, mixing again to distribute evenly. The buckwheat groats will add a delightful crunch, but crushing them slightly ensures they integrate without overwhelming the texture.
Make a well in the center of the dry ingredients and pour in the yeast mixture, flax egg, and 0.5 cup extra-virgin olive oil. Using a wooden spoon or dough whisk, gradually incorporate the liquids while stirring from the bottom up. The dough will be shaggy at first—this is normal. Once combined, let it rest for 5 minutes to allow the flours to fully hydrate.
Knead and Shape the Dough
Transfer the dough to a lightly floured surface and knead gently for 5-7 minutes until it becomes smooth and elastic. Avoid over-kneading, as this can develop too much gluten and make the bread dense. The dough should be slightly sticky but manageable—add a bit more rice flour if needed, but don't overdo it.
Shape the dough into a round loaf and place it in a lightly oiled bowl. Cover with a damp kitchen towel and let it rise in a warm place for 1-1.5 hours, or until it has nearly doubled in size. You'll know it's ready when the dough springs back slowly when poked with a finger—this indicates proper fermentation.
Proof and Bake for a Crispy Crust
Preheat your oven to 375°F and place a small baking dish or oven-safe skillet on the middle rack to heat as well. Once the oven is hot, turn the risen dough onto a parchment-lined baking sheet. Gently shape it into an oval or round loaf, then brush the top with a bit of water or olive oil. Sprinkle 1 tbsp sesame seeds evenly over the surface for a decorative finish and added crunch.
Bake for 30-35 minutes until the bread is deep golden brown and sounds hollow when tapped on the bottom. The internal temperature should reach 190-200°F—use an instant-read thermometer to confirm. If the top browns too quickly, tent the bread with foil to prevent burning while it finishes baking.
Cool and Enjoy
Remove the bread from the oven and let it cool on a wire rack for at least 20 minutes before slicing. This resting period allows the crumb to set and prevents a gummy texture. The bread should have a crisp exterior with a tender, slightly chewy interior and pockets of airiness from the rice flour.
Slice the bread while still slightly warm for the best texture—each bite should deliver a harmonious blend of nutty buckwheat flavor, subtle sweetness from the yeast and sugar, and a satisfying crunch from the sesame seeds. Store any leftovers in an airtight container for up to 3 days, or freeze for longer storage.
Pro Tips For Making Buckwheat And Rice Flour Bread
- Sift the flours together: DESCRIPTION: Buckwheat flour is dense and clumpy—don’t just dump it in. Sift it with the rice flour first to avoid a heavy, gummy dough. I learned this the hard way when my first batch turned out like a brick. A quick sift also aerates the mix, which helps the yeast do its job later.
- Toast the groats first: DESCRIPTION: Skip the pre-toasting step, and your bread will taste flat. Dry-toast the buckwheat groats in a pan until they smell nutty and deep—about 5-7 minutes on medium-low. This adds a rich, toasty flavor that raw groats just can’t match. (Yes, even if you’re impatient like me.)
- Proof at 75°F (24°C): DESCRIPTION: Yeast hates extremes, and this dough is tricky. If your kitchen’s too cold, the dough will take forever—or worse, fail to rise. Use a warm spot (like the oven with the light on) and check after 1.5 hours. If it’s not doubled, give it another 30 minutes. No guessing—use a thermometer.
- Steam the first 10 minutes: DESCRIPTION: This isn’t a regular loaf—it’s dense and prone to cracking. Place a metal bowl of boiling water in the oven when you bake, then close the door. The steam keeps the crust from forming too fast, giving the bread time to expand evenly. I was skeptical until I tried it—now it’s non-negotiable.
Pro cooking tips for great buckwheat and rice flour bread
Hydration Secrets
The key to this bread's tender crumb lies in the 1.5 cups warm water and 0.5 cup olive oil working together to create a cohesive, yet airy structure.
Unlike traditional breads, gluten-free flours like buckwheat and rice absorb moisture differently—too much water makes it gummy, too little creates a dense loaf.
I find using a digital kitchen scale for accurate measurements helps maintain the perfect hydration ratio of roughly 140% hydration (water + oil relative to flour weight). 💧
Cold Fermentation Boost
Skip the warm proofing and let the dough rest in the fridge for 2 hours before baking. This cold fermentation slows yeast activity, allowing flavors to develop more deeply while preventing overproofing.
I place my dough in a glass jar covered with a damp towel—this creates a humid environment that mimics professional bakery conditions. The result? A more complex flavor profile and better texture control. ❄️
Dutch Oven Hack
For an even crispier crust, bake your loaf in a preheated Dutch oven at 375°F for the first 20 minutes. The enclosed steam helps create that coveted oven spring while preventing over-browning.
I like to place a small metal tray filled with water on the oven rack below for extra moisture. After 20 minutes, remove the lid and bake until golden brown. This technique works especially well in dry climates where bread can dry out quickly. 🔥
Crust Perfection
Brush the baked loaf with melted coconut oil while still warm for an extra-shiny, crackly crust. I also sprinkle extra sesame seeds on top right before baking—they toast beautifully in the oven and add a delightful crunch.
For a sweeter crust, mix 1 tsp maple syrup into the water before brushing. This simple step elevates the bread from good to restaurant-quality. 🌟
Gluten-Free Kneading
Gluten-free dough behaves differently than wheat-based dough, so gentle handling is key. I use my hands to stretch and fold the dough 3-4 times during the 1.5-hour rise instead of traditional kneading.
This develops just enough structure without overworking the delicate flours. The dough should feel slightly tacky but not sticky—add 1 tsp more rice flour if needed, but no more. 💪
Yeast Activation Test
Before mixing, always test your yeast by combining it with 1 tsp sugar and ¼ cup warm water. If it doesn't foam within 5-10 minutes, your yeast is likely inactive.
I keep a small jar of Bob's Red Mill active dry yeast in my freezer—it stays fresh for months. For extra insurance, use 1 tsp apple cider vinegar in the dough to help activate any sluggish yeast. This simple step prevents flat, dense loaves. 🍞
Nutrition facts
Frequently asked questions
Can I make this bread without yeast?
Yes! Replace the yeast with 1.5 tsp baking soda and 1 tbsp apple cider vinegar for a quick-rise version. The texture will be denser but still delicious. For best results, bake immediately after mixing and use a 350°F oven for 35-40 minutes—the loaf won't rise as much as yeasted bread.
Why does my buckwheat bread taste bitter?
Bitterness comes from untoasted buckwheat flour or over-baking. Always toast your buckwheat groats and flour in a dry pan for 3-4 minutes until fragrant. Bake until internal temp reaches 190-200°F—over-baking intensifies bitterness. For milder flavor, reduce buckwheat flour by ¼ cup and add extra rice flour.
How do I store this bread to keep it fresh longer?
Wrap cooled slices in parchment paper and store in an airtight container at room temperature for 3-4 days. For longer storage, freeze slices in a single layer before transferring to a bag—this prevents freezer burn. To revive, warm in a 350°F oven for 5-7 minutes with foil. Never refrigerate—it dries out the crumb.
Can I add seeds or nuts to this recipe?
Try 1 tbsp chia seeds or ¼ cup chopped walnuts for extra nutrition. Fold them into the dough after the initial mix, but don't exceed ½ cup total additions—too much can make the bread dense. Toast seeds/nuts first for enhanced flavor. For crunch, sprinkle on top before baking.
Why did my bread turn out dense instead of light?
Dense bread usually means over-kneading, insufficient yeast activation, or too little hydration. Gluten-free dough needs gentle handling—avoid vigorous kneading. Always test yeast first (should foam in 5-10 minutes), and measure liquids precisely. If the dough feels dry, add 1 tbsp extra water before shaping. For extra lift, try cold fermentation in the fridge for 2 hours before baking.