
Side Dishes
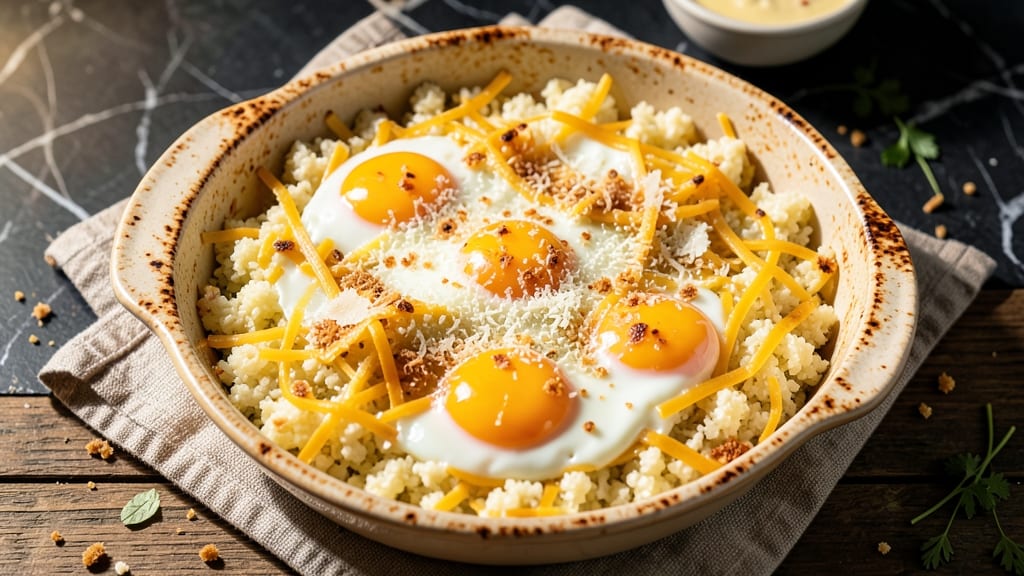
This cauliflower rice bake recipe transforms a simple vegetable into a cheesy, crispy-topped masterpiece that rivals traditional casseroles. The secret lies in a golden, herb-infused crust that locks in moisture while delivering that satisfying crunch.
I developed this after realizing how often cauliflower rice gets overlooked—until you bake it with the right technique, it becomes the star of any meal.
What makes this recipe work is the balance of textures: tender cauliflower rice at the center, surrounded by a crispy cheese crust that holds together beautifully. The process is straightforward—no fancy equipment needed—just a baking dish, a handful of pantry staples, and about 30 minutes of active prep time.
The dish delivers restaurant-quality comfort without the heavy carbs, making it perfect for low-carb diets or anyone craving something hearty yet lighter.
The result is a dish that smells like a homey casserole while being packed with flavor—garlicky, cheesy, and slightly nutty from the cauliflower. Each bite offers that perfect contrast of creamy filling and crunchy top, and it reheats just as well the next day.
This is the kind of recipe that turns a simple side into the main event, effortlessly.
Whether you're meal prepping for the week or serving up dinner tonight, this bake adapts easily. Add sautéed mushrooms, spinach, or even a sprinkle of bacon for extra depth. Here’s how to make it—simple, foolproof, and impossible to resist.
Ingredients for cauliflower rice bake
Pantry staples meet fresh produce in this golden, cheesy cauliflower rice bake—crispy on top, creamy inside.
| Ingredient | Amount | Notes |
|---|---|---|
| Fresh Cauliflower Rice 🥬 | 4 cups | Riced or finely chopped cauliflower |
| Shredded Sharp Cheddar Cheese 🧀 | 1 ½ cups | Aged for maximum flavor |
| Extra-Sharp Parmesan Cheese 🧀 | ½ cup | Freshly grated from block |
| Large Eggs 🥚 | 2 whole | Room temperature for even binding |
| Heavy Cream 🥛 | ½ cup | Full-fat for rich texture |
| Unsalted Butter 🧈 | 2 tbsp | Melted for crispy crust |
| Fresh Garlic Cloves 🧄 | 3 cloves | Minced finely for depth |
| Fresh Parsley 🌿 | ¼ cup | Chopped for freshness |
| Diamond Crystal Kosher Salt 🧂 | 1 tsp | For seasoning and crust |
| Ground Black Pepper 🌶️ | ½ tsp | Freshly cracked for heat |
| Dried Thyme 🌿 | 1 tsp | For earthy aroma |
| Panko Breadcrumbs 🍞 | ½ cup | For extra crunch |
| Vegetable Oil 🫒 | 1 tbsp | For greasing baking dish |
The cauliflower rice is the foundation, so choose fresh, firm heads—the crunchier the florets, the better the texture after baking. I always grab organic from Whole Foods or my local farmers market for the best flavor. For the cheese, aged sharp cheddar is non-negotiable—it melts beautifully and delivers that signature tang. Store-bought shredded cheese gets clumpy, so I shred my own using a box grater. The Parmesan should be Parmigiano-Reggiano if possible, freshly grated for maximum umami punch. Fresh herbs like parsley add brightness, but dried thyme works in a pinch if you're short on time.
No sharp cheddar? Pepper jack or Gruyère both work beautifully for a different flavor profile. Substitute heavy cream with Greek yogurt or coconut milk> for a lighter option, though the texture will vary slightly. The Panko breadcrumbs add that satisfying crunch—if you don't have any, crushed cornflakes or almond flour> work as alternatives. For extra richness, stir in 1 tbsp nutritional yeast**> with the Parmesan. The garlic can be roasted for a sweeter note, but minced fresh works perfectly fine. The eggs are essential for binding, but if you're making this vegan, flax eggs (2 tbsp ground flaxseed + 6 tbsp water)**> will hold everything together.
This bake reheats beautifully, making it perfect for meal prep. Store leftovers in an airtight container for up to 4 days> in the fridge, or freeze portions for 3 months>. To reheat, cover with foil and warm in the oven at 350°F for 15-20 minutes. The crust gets crispy again when reheated, so it's worth the extra minute. For best results, assemble the dish and refrigerate for 1 hour**> before baking—this helps the crust form properly. The flavors deepen overnight, so it's even better the next day.
Why You'll Love This Recipe
- I’ll be real: it feels like a fancy casserole, but the ingredients are cheap and stretch far. Cauliflower rice is a fraction of the cost of regular rice, and the cheeses make it feel indulgent without breaking the bank. Plus, leftovers taste just as good reheated as they do fresh—win-win.
- Five-Ingredient Magic: Honestly, I swear by this recipe because it’s that simple—just cauliflower rice, cheddar, parmesan, eggs, and cream. No chopping, no fuss, and no last-minute grocery runs. The only prep is draining the cauliflower (if you buy pre-riced) and mixing everything in one bowl.
- Cheesy Crispy Dream: That crispy top from the melted cheddar and parmesan? Chef’s kiss. The eggs and cream give it a creamy, custardy bite, while the sharp cheddar adds a punch that makes it taste way richer than it is. It’s the kind of dish that disappears faster than I can say “seconds?”
- Lunchbox Hero: Between us, this is my go-to for meal prep—it reheats beautifully and keeps for days. Pack it in containers for work lunches, or serve it cold the next day as a filling, protein-packed side. My kids actually ask for it, and that’s saying something.
Step-by-step instructions for cauliflower rice bake
Here's the method for achieving that perfect crispy top and cheesy interior every time.
Prepare the Cauliflower Base
Preheat your oven to 375°F and grease a 9-inch round baking dish with the 1 tablespoon vegetable oil. This ensures our bake doesn't stick and creates a proper barrier for crisping. In a large bowl, combine the 4 cups fresh cauliflower rice with the 2 tablespoons melted unsalted butter, 3 cloves minced fresh garlic cloves, 1 teaspoon dried thyme, 1 teaspoon Diamond Crystal kosher salt, and ½ teaspoon ground black pepper.
Mix thoroughly until the cauliflower is evenly coated. The butter should distribute completely, giving each piece a golden foundation. Spread the mixture evenly into the prepared baking dish, pressing down gently with the back of a spoon. This compaction helps create a firmer base that crisps better during baking. The cauliflower should form an even layer about ¾-inch thick throughout the dish.
Create the Cheesy Egg Mixture
In a separate bowl, whisk together the 2 whole large eggs, ½ cup heavy cream, 1½ cups shredded sharp cheddar cheese, and ½ cup freshly grated extra-sharp parmesan cheese until completely smooth. This mixture should be thick but pourable - if it's too thick, whisk in 1 tablespoon additional heavy cream to achieve the right consistency. The cheese should be fully incorporated with no visible lumps.
Pour this egg-cheese mixture evenly over the cauliflower base in the baking dish. Use a spatula to gently spread it out, making sure every part of the cauliflower is coated. This layer will be the heart of our bake, providing that rich, cheesy comfort we're after. The mixture should cover the cauliflower completely but not overflow the dish edges.
Add the Crispy Topping Layer
Sprinkle the ½ cup panko breadcrumbs evenly over the top of the egg-cheese mixture. Press them down gently but firmly with your fingers or the back of a spoon. This creates that signature crispy crust we're aiming for. The breadcrumbs should form an even layer with no gaps - this is where the magic happens for that perfect texture contrast.
Finally, sprinkle the ¼ cup chopped fresh parsley over the top for both color and freshness. The parsley will add a bright note that cuts through the richness of the cheese. Place the baking dish on a rimmed baking sheet (to catch any potential spills) and bake for 35-40 minutes until the top is deep golden brown and the edges are bubbling.
Finish with Perfect Timing
Remove the bake from the oven when the top is golden brown and a knife inserted into the center comes out clean. The internal temperature should read 160°F at its thickest point. Let it rest for 5 minutes before slicing - this allows the layers to set properly and makes for cleaner cuts. The crust should be crispy enough to hold its shape when lifted with a fork.
For serving, run a thin knife around the edges to loosen, then slide a spatula underneath to release the entire bake. This ensures clean slices that maintain their shape. The interior should be creamy and fully set, with the cauliflower perfectly tender but still holding its shape. Cut into wedges or squares and serve immediately while the top is still crispy and the cheese is melty.
Pro Tips For Making Cauliflower Rice Bake
- Sauté Cauliflower First: Dump that raw cauliflower rice straight into your pan and you’re asking for a soggy mess. Sauté it for 4-5 minutes on medium-high heat until it’s just starting to soften—you want it to release some moisture but still hold its shape. I learned this the hard way when my first batch turned into a sad, watery puddle.
- Salt the Eggs: Skip salting the eggs, and your bake will taste bland no matter how much cheese you pile on. Crack them into a bowl, add a pinch of salt, and whisk them like you mean it—this makes a real difference in flavor. (Yes, even if you’re impatient like me.)
- Don’t Overmix the Cheese: Stir the cheese in just until combined—any more, and you’ll end up with a dense, gummy texture. The goal is to distribute it evenly, not turn it into a paste. I was skeptical until I tried it, and now I never go back.
- Bake Until Golden: Pull it out when the top is golden and the edges are set—underbake it, and you’ll have a sad, rubbery center. If yours looks pale, crank the oven up 25°F for the last 5 minutes. (Your future self will thank you.)
Essential equipment for cauliflower rice bake
Baking Dish Essentials
You'll need a 9-inch round baking dish with at least 2-inch high sides to contain the filling and create that perfect crispy crust. I recommend ceramic or oven-safe glass dishes—they distribute heat evenly and prevent sticking.
My go-to is a Corelle stoneware dish because it handles temperature changes without cracking. Avoid thin metal pans that can cause uneven browning. 🥣
Mixing Tools
A large mixing bowl (at least 3-quart capacity) is crucial for combining the cauliflower rice and egg-cheese mixture. I use a stainless steel bowl from OXO because it's durable and easy to clean.
For whisking the egg mixture, a balloon whisk ensures smooth incorporation without lumps. A spatula (preferably silicone-rimmed) helps spread the mixture evenly in the baking dish.
Measuring Precision
Accurate measurements make all the difference in this recipe. Use a stainless steel measuring cup for the 4 cups cauliflower rice and a dry measuring spoon set for the 1 teaspoon thyme and ½ teaspoon pepper.
For the cheese, a box grater (like Microplane) gives you the freshest, finest shreds. A kitchen scale isn't mandatory, but it ensures consistency if you're making this frequently.
Crispy Top Secrets
The panko breadcrumbs are your secret weapon for that golden crust. Store them in an airtight container to keep them fresh and prevent moisture absorption. A fine-mesh sieve helps distribute them evenly over the top.
For extra crispiness, I like to press them down firmly with the back of a spoon or my fingers before baking. This creates a tight, even layer that crisps beautifully. 🔥
Oven Thermometer
Ovens vary wildly in accuracy, so I always use an oven thermometer (like Thermoworks) to verify your oven's temperature. This is especially important for achieving that perfect 375°F bake. Place it near the baking dish while preheating to ensure your oven is hitting the right heat.
A few degrees off can mean the difference between a perfectly crispy top and a soggy one.
Serving Tools
For serving, a sharp chef's knife and long spatula make clean cuts through the crispy crust. I also keep a small offset spatula handy for lifting slices without breaking them. A serving platter with a rim prevents messy drips when transferring the bake from the dish.
For extra presentation, garnish with extra parsley or a sprinkle of smoked paprika right before serving. ✨
Nutrition facts
Frequently asked questions
Can I use frozen cauliflower rice for this recipe?
Thaw and drain frozen cauliflower rice completely before using. The texture will be slightly softer than fresh, but it works perfectly. Just squeeze out any excess moisture with a clean kitchen towel to prevent a soggy bake.
How do I make this recipe keto-friendly?
Swap the heavy cream for unsweetened almond milk and use cream cheese> instead of cheddar. Replace panko with crushed pork rinds> for a crispy, low-carb crust. Keep the egg and cheese amounts the same for binding and flavor. This version stays under 5g net carbs per serving>!
Why did my cauliflower rice bake turn out watery?
This usually happens when the cauliflower wasn't drained properly or the oven temperature was too low. Always squeeze out moisture from fresh or thawed cauliflower rice, and ensure your oven reaches 375°F>. Baking at a slightly higher temperature (390°F>) for 5 minutes> at the end can help crisp up any soggy spots.
Can I add protein to this bake?
Yes! Mix in ½ cup cooked chicken sausage> or ½ cup diced ham> with the cauliflower base. For vegetarian options, try ½ cup crumbled feta> or ½ cup sautéed mushrooms>. Just be mindful of moisture—pat cooked proteins completely dry before adding.
How long can I store leftovers?
Store in an airtight container for 4 days> in the fridge or 3 months> in the freezer. Reheat covered with foil at 350°F> for 15-20 minutes>. The crust may lose some crispiness but reheats beautifully. For best results, freeze before the crust fully sets.