
Main Courses
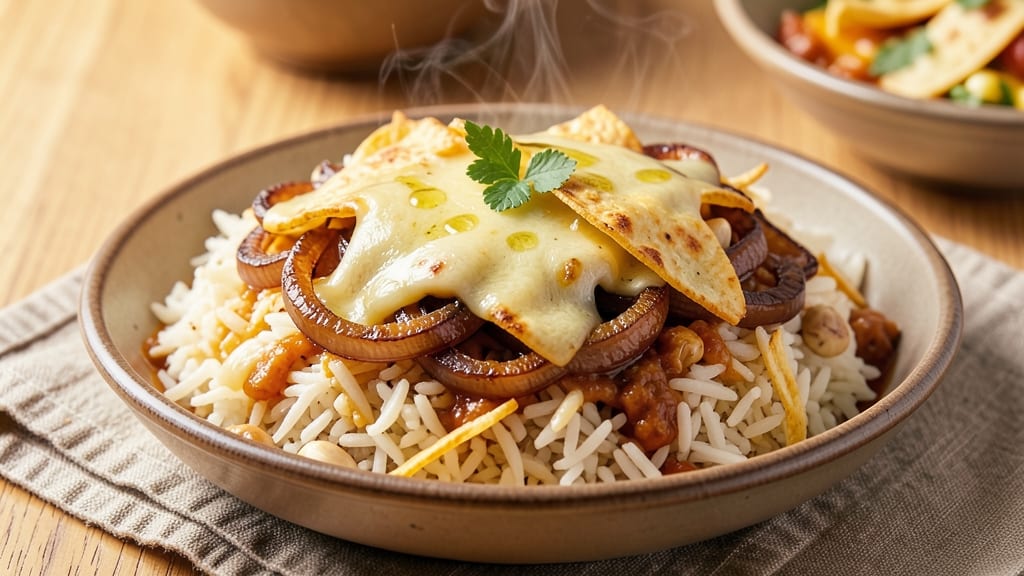
This cheesy enchilada rice recipe transforms simple ingredients into a smoky, melty masterpiece that’s perfect for weeknight dinners or crowd-pleasing meals. 🌟 The key? Toasting the rice for nutty depth and layering it with gooey cheese and crispy tortilla bits—every bite delivers that satisfying crunch and creamy pull.
I’ve perfected this version to balance rich flavors without being heavy, using pantry staples and a few smart techniques that make it foolproof.
What sets this apart is the smoky undertone from sautéed onions and garlic, which builds a flavorful base before the cheese melts into a luscious blanket over the rice.
The tortilla crunch adds texture that keeps it exciting, while optional add-ins like black beans or jalapeños let you customize it to your taste. Ready in just 30 minutes, this dish is restaurant-quality without the fuss—ideal for feeding a family or prepping ahead for meal prep.
Ingredients for cheesy enchilada rice
Pantry staples plus a few key ingredients for that irresistible smoky, cheesy crunch.
| Ingredient | Amount | Notes |
|---|---|---|
| Long-Grain White Rice 🍚 | 1 ½ cups | Uncooked, jasmine or basmati preferred |
| Yellow Onions 🧅 | 1 whole | Diced small, about 1.5 cups |
| Garlic Cloves 🧄 | 4 cloves | Minced finely for smoky flavor |
| Extra-Virgin Olive Oil 🫒 | ¼ cup | For sautéing onions and garlic |
| Corn Tortillas 🌯 | 6 whole | Cut into small triangles for crunch |
| Shredded Monterey Jack Cheese 🧀 | 2 cups | Freshly shredded for meltiness |
| Cheddar Cheese 🧀 | 1 cup | Shredded sharp cheddar preferred |
| Chicken Broth 💧 | 1 ½ cups | Low-sodium preferred for flavor control |
| Black Beans 🫘 | 1 cup | Drained and rinsed, optional add-in |
| Jalapeños 🌶️ | 2 whole | Diced, optional for heat |
| Ground Cumin 🌿 | ½ tsp | Toasted for deeper flavor |
| Smoked Paprika 🌶️ | ½ tsp | For that smoky depth |
| Salt 🧂 | 1 tsp | Diamond Crystal preferred |
| Black Pepper 🌶️ | ¼ tsp | Freshly ground for bite |
The rice is the foundation, so don't skimp on quality—jasmine or basmati toasts up beautifully for that nutty depth. Trader Joe's or Whole Foods carry great bulk bins if you're prepping ahead. For the cheese, Monterey Jack and sharp cheddar are non-negotiable—they melt like a dream and deliver that perfect pull. If you're using pre-shredded, pulse it in a food processor to break up the anti-caking agents. The tortillas? Corn tortillas add authentic crunch, but flour works in a pinch (just toast them longer).
No black beans? Substitute with pinto beans or skip entirely—this dish still shines. Fresh jalapeños too spicy? Swap in mild green chiles or skip the heat altogether. Running low on cumin? Smoked paprika alone can carry the smoky flavor, though the combo is ideal. For the broth, low-sodium is key—you can always add salt later, but you can't take it out. And if you're prepping ahead, freeze the cheese separately to prevent sogginess.
This reheats like a dream—just add a splash of broth or water to keep it moist. Keeps for 4-5 days in the fridge, 3 months frozen. I always double the batch and portion it into glass containers for easy meal prep. The tortilla crunch gets even better after reheating, so save some fresh for the top if serving immediately.
Why You'll Love This Recipe
- One-Pot Magic: I swear by this—just toss rice, onions, garlic, and broth in one pot, let it simmer, then fold in those crispy tortilla bits. No extra dishes, no stress, and honestly? It’s the kind of meal that makes me want to cook more often.
- Cheese Pull Factor: That melted cheddar and Monterey Jack clinging to every grain? It’s the good stuff. The tortillas add a toasty crunch, and between us, I’ve never met a bowl of rice this irresistible.
- Lunchbox Hero: Pack it for work or school—it reheats like a dream and keeps everyone full. My kids actually finish their lunches when this is involved. (Yes, even on a Tuesday night.)
- Budget Win: Rice, tortillas, and a block of cheese stretch for days. I’ve fed four people for under $10 with this, and the leftovers? Just as good the next day—if they last that long.
Step-by-step instructions for cheesy enchilada rice
Here's how to make this crowd-pleasing dish with layers of smoky, cheesy goodness.
🍳 Step 1: Sauté Aromatics Until Fragrant
Heat the 0.25 cup Extra-Virgin Olive Oil in a medium pot over medium heat. Add the 1 whole Yellow Onions and cook for 5-6 minutes until softened and translucent. Here's the thing—you want them to caramelize just slightly, so don't rush this step.
Add the 4 cloves Garlic Cloves and the 0.5 tsp Ground Cumin and 0.5 tsp Smoked Paprika. Stir for 30 seconds until the garlic becomes fragrant and the spices bloom. This aromatic base is the flavor foundation for your enchilada rice. If you smell the garlic burning, immediately reduce the heat to low—it's ready to move on once it's golden but not crispy.
👨🍳 Step 2: Toast the Rice and Add Liquids
Add the 1.5 cups Long-Grain White Rice to the pot and stir to coat it evenly in the oil. Toast the rice for 2 minutes until you notice it's becoming translucent at the edges—this builds flavor. I like to press down gently with a wooden spoon to ensure even contact with the hot oil.
Pour in the 1.5 cups Chicken Broth and bring to a gentle boil. Once boiling, reduce heat to low, cover the pot, and simmer for 15 minutes. Don't peek during this time—steam is your friend here. After 15 minutes, fluff the rice with a fork and let it sit covered for 5 minutes to steam through.
🥘 Step 3: Mix in Cheese and Tortilla Crunch
While the rice finishes steaming, cut the 6 whole Corn Tortillas into small triangles—about ½-inch pieces. Heat 1 tablespoon of the reserved olive oil in a separate skillet over medium heat and toast the tortilla pieces for 2-3 minutes until they're golden and crispy. Set aside on a paper towel-lined plate.
In a large bowl, combine the cooked rice, 2 cups Shredded Monterey Jack Cheese, 1 cup Cheddar Cheese, 1 cup Black Beans, and 2 whole Jalapeños (diced if you want heat). Stir in the toasted tortilla triangles and 1 tsp Salt and 0.25 tsp Black Pepper. The cheese should start melting slightly from the residual heat—this is your signal that everything is coming together perfectly.
🔥 Step 4: Bake Until Bubbly and Golden
Transfer the rice mixture to a greased 9x9-inch baking dish and spread it evenly. Cover with aluminum foil and bake at 375°F for 15 minutes. Here's where it gets magical—uncover and bake for another 10-12 minutes until the top is golden brown and bubbly. You'll see the cheese forming a delicious crust on top, and the tortilla pieces will be extra crispy.
Let it rest for 5 minutes before serving—this allows the cheese to set slightly and makes it easier to scoop. The rice should be tender, the cheese melted and stretchy, and the tortilla pieces adding that perfect crunch with every bite. Serve immediately with sour cream, salsa, or guacamole for the ultimate enchilada rice experience.
Pro Tips For Making Cheesy Enchilada Rice
- TOAST THE TORTILLAS: I learned this the hard way—skipping the quick toast in olive oil before shredding makes the rice gummy. Heat them 30 seconds per side until just golden, then chop. The extra crunch and flavor stick around after mixing.
- SOAK THE RICE RIGHT: Dumping dry rice into boiling broth? Nope. Rinse it first, then toast in olive oil for 2 minutes until fragrant. The rice absorbs better and stays fluffy—no mushy surprises when you fold in cheese later.
- SALT THE BROTH LATE: Add salt only after the rice has cooked 10 minutes. Early salting makes the tortilla pieces soggy faster. Wait until the rice is nearly done, then season the broth properly—it’ll balance the cheesy richness.
- SHRED TORTILLAS SMALL: Tiny pieces melt into the rice better than big chunks. Cut them into ¼-inch strips before toasting—this ensures even distribution and prevents a cheesy "lumpy" texture when mixing. (Yes, I’ve made that mistake.)
Essential equipment for perfect results
Essential Cookware
You’ll need a medium-sized pot with a tight-fitting lid for toasting the rice—my go-to is a 5-quart stainless steel pot from All-Clad. This size gives you enough room to stir without overcrowding, and the stainless steel distributes heat evenly.
For the tortilla crunch, a 10-inch nonstick skillet (like Calphalon) works perfectly—it heats up quickly and prevents the tortillas from sticking. 🔥
If you’re baking, a 9x9-inch baking dish is non-negotiable. I prefer Ceramic Core dishes—they brown the cheese beautifully and hold up to high heat without warping. For extra crispiness, line the dish with parchment paper first to avoid sticking, especially if you’re using a glass dish.
Cheese Tools
Freshly shredded cheese makes all the difference—never use pre-shredded cheese straight from the bag. Instead, buy a block of Monterey Jack and sharp cheddar and shred it yourself using a box grater or food processor with the shredding blade.
For the food processor method, pulse the cheese in 1-second bursts to avoid clumping. If you’re short on time, a microplane works well for smaller batches. 🧀
Pro tip: To keep the cheese from sticking to your hands, wet your fingers slightly before handling it. And if you’re prepping ahead, store the cheese separately in an airtight container in the fridge—it’ll stay fresh for up to 5 days without drying out.
Knife and Cutting Gear
A sharp chef’s knife (I use a Wüsthof 8-inch) is essential for dicing onions and garlic finely. For the tortillas, a serrated knife makes quick work of cutting them into ½-inch triangles—just fold each tortilla in half, then slice through the center.
If you’re adding jalapeños, a mandoline with a thick blade ensures even slices for consistent heat distribution. 🌶️
Don’t skip the cutting board—opt for a large, stable board (like John Boos Teak) to keep your workspace organized.
A small offset spatula comes in handy for scraping up every last bit of caramelized onion from the pot, and a wooden spoon helps toast the rice evenly without scratching your cookware.
Optional Upgrades
For a smoky depth without charring, a cast-iron skillet (like Lodge) can replace the pot for sautéing onions and garlic—it retains heat beautifully and adds a subtle iron-rich flavor.
If you love texture, toast the tortillas in a toaster oven set to 375°F for 3-4 minutes—they’ll get extra crispy without watching them closely. 💫
No oven? No problem. Use a large cast-iron skillet on the stovetop to melt the cheese—just cover it with a lid and let the residual heat work its magic for 5-7 minutes.
For extra flavor, toast the spices (cumin and smoked paprika) in a dry skillet for 30 seconds before adding them to the onions—this deepens their aroma significantly.
Nutrition facts
Frequently asked questions
Can I make this recipe without baking?
Skip the baking step and mix everything in a skillet. After combining the rice, cheese, and tortilla triangles in a bowl, transfer to a 10-inch cast-iron skillet over medium-low heat. Cover with a lid and let it melt for 5-7 minutes, stirring occasionally until the cheese is fully melted and the tortillas are crispy. This stovetop method works perfectly for smaller batches or when you don’t have an oven.
What’s the best way to store leftovers?
Store in an airtight container in the fridge for up to 4-5 days. For freezing, portion into single servings, cover tightly with plastic wrap, then place in a freezer bag. It keeps for 3 months—just reheat in the microwave for 2-3 minutes with a splash of water or broth to restore moisture. The tortilla crunch might soften slightly, so save some fresh triangles for topping when reheating.
Can I use flour tortillas instead of corn?
Yes, but they’ll be less authentic and may burn faster. If using flour tortillas, cut them into ¼-inch strips and toast them in the oven at 375°F for 3-4 minutes until golden. They’ll still add crunch, but corn tortillas have a firmer texture that holds up better during baking. For extra flavor, brush them lightly with oil before toasting.
Why did my cheese get rubbery?
Rubbery cheese usually happens from overcooking or using pre-shredded cheese with anti-caking agents. Always shred your own cheese for the best melt, and avoid baking uncovered for too long. If it happens, sprinkle a little sour cream or milk over the top and broil for 1-2 minutes to restore creaminess. For next time, keep the oven at 375°F and bake uncovered for just 10-12 minutes—no longer!
What’s the secret to extra crispy tortilla bits?
Toast them in a single layer in a dry skillet over medium-high heat for 2-3 minutes, stirring constantly. For even more crunch, bake them alone on a parchment-lined tray at 375°F for 5 minutes before mixing into the rice. Pro tip: Use corn tortillas—they’re sturdier than flour and hold up better to high heat.