
Main Courses
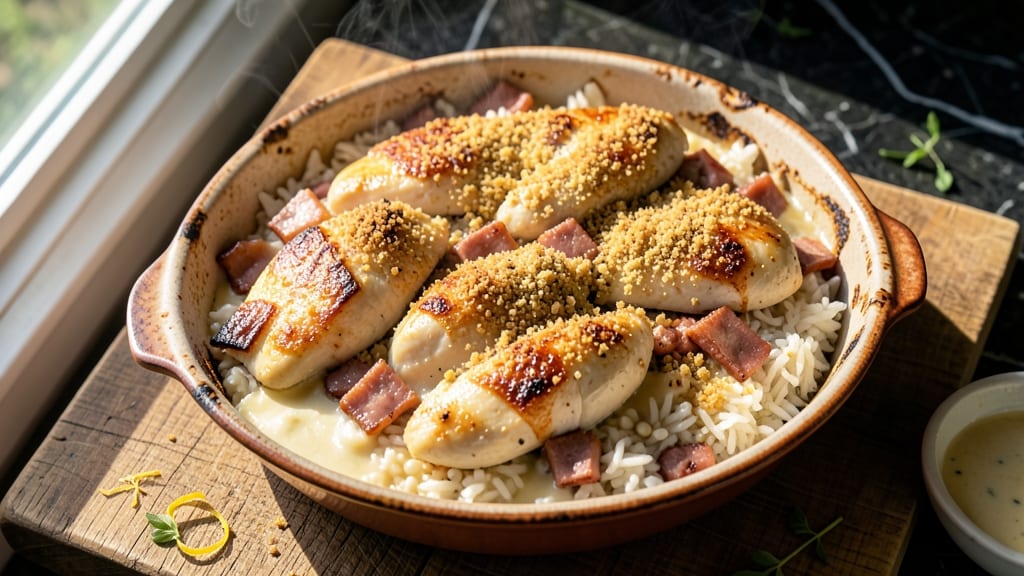
This chicken ham and rice casserole recipe delivers the ultimate comfort food experience with golden, crispy celery topping and layers of savory goodness.
The secret to that perfect texture lies in baking the celery mixture separately until it's perfectly crispy before sprinkling it on top—trust me, it makes all the difference.
This dish combines tender chicken, salty ham, and fluffy rice in a creamy sauce that's both hearty and satisfying, making it ideal for family dinners or meal prep.
What sets this casserole apart is the balance of textures—creamy, tender layers with a satisfying crunch from the celery topping. The recipe is designed to be foolproof, with clear layering instructions that ensure even cooking and maximum flavor in every bite.
Whether you're serving it as a main course or bringing it to a potluck, this dish always gets rave reviews. Ready to create a showstopper that's as delicious as it is impressive?
Ingredients for chicken ham and rice casserole
Six servings of comfort food with layers of flavor and that signature crispy celery topping.
| Ingredient | Amount | Notes |
|---|---|---|
| Boneless, Skinless Chicken Breast 🍗 | 2 lb | Cut into bite-sized pieces |
| Diced Ham 🥓 | 1 ½ cups | Low-sodium preferred |
| Long-Grain White Rice 🍚 | 2 cups | Uncooked, converted measurement |
| Chicken Broth 💧 | 2 cups | Low-sodium preferred |
| Whole Milk 🥛 | 1 cup | Full-fat for creaminess |
| Heavy Cream 🥛 | ½ cup | Full-fat preferred |
| Yellow Onion 🧅 | 1 whole | Diced into small pieces |
| Celery Stalks 🥬 | 3 whole | Diced for crispy topping |
| Butter 🧈 | ½ cup | Unsalted, cubed |
| All-Purpose Flour 🌾 | ½ cup | For crispy topping |
| Salt 🧂 | 1 ½ tsp | Kosher or sea salt |
| Black Pepper 🌶️ | ½ tsp | Freshly ground preferred |
| Garlic Cloves 🧄 | 3 cloves | Minced for flavor |
| Dried Thyme 🌿 | 1 tsp | Or 1 tbsp fresh |
| Shredded Cheddar Cheese 🧀 | 1 cup | Sharp cheddar preferred |
The celery topping is where the magic happens—fresh celery with vibrant green stalks gives the best texture. Trader Joe's or Whole Foods carry the crispest celery, but your regular grocery store works too. Look for stalks that are firm and bright green, not limp or yellowing. The ham makes this dish hearty, so low-sodium is key—you'll be adding plenty of salt in the seasoning. For the chicken, cutting into even pieces ensures everything cooks at the same rate. I always grab boneless, skinless breasts from the meat counter, but thighs work too if you prefer more moisture.
No crispy celery topping? Substitute crushed potato chips for a quick crunch—just sprinkle them on top after baking. Running low on chicken broth? Vegetable broth works perfectly, though it'll have a slightly different flavor profile. The creaminess comes from whole milk and heavy cream—don't use low-fat, trust me on this. For a lighter version, swap half the heavy cream for evaporated milk. The thyme is non-negotiable here—fresh thyme has a brighter flavor, but dried works in a pinch at one-third the amount. If you're prepping ahead, cook the rice separately and assemble the casserole just before baking for the best texture.
This casserole reheats beautifully—cover with foil and warm in the oven for 15 minutes. Keeps for 4-5 days in the fridge, but honestly, it disappears faster than that. For meal prep, portion into individual containers so you can grab and go. The crispy topping loses its crunch when reheated, so always make a fresh batch for leftovers. Freezes well for up to 3 months—thaw overnight in the fridge before reheating. The cheese gets gooey and delicious when reheated, so don't skip it!
Why You'll Love This Recipe
- One-Pan Magic: I swear by this recipe when I’m too tired to wash dishes. Just toss the chicken, ham, and rice in one baking dish, pour in the broth and milk, and let the oven do the work—no pots, no pans, just golden perfection waiting for you.
- Salty-Savory Crunch: That crispy top layer? Chef’s kiss. The milk and broth create a creamy sauce while the ham adds just enough saltiness to make every bite feel like a hug. Honestly, the flavor balance is what keeps me coming back.
- Meal Prep MVP: Between us, this is my go-to for lunches all week. The rice stays fluffy, the chicken stays tender, and the ham adds protein that makes it feel like a proper meal—not sad leftovers. I double the batch every Sunday.
- Budget-Friendly Feast: Chicken breast and ham might sound fancy, but they stretch across multiple servings without breaking the bank. Plus, using white rice keeps it simple and affordable—perfect for feeding a crowd or just stretching dinner into leftovers.
Step-by-step instructions for chicken ham and rice casserole
This method delivers a rich, flavorful casserole with a perfectly crispy celery topping every time.
Prepare the Chicken and Ham Mixture
In a large skillet, combine the 2 lb boneless, skinless chicken breast cut into bite-sized pieces with the 1.5 cups diced ham. Cook over medium-high heat until the chicken reaches an internal temperature of 165°F—about 6-8 minutes. You'll notice the chicken pieces turning opaque and the ham beginning to brown slightly.
Transfer the cooked chicken and ham to a large mixing bowl. Stir in the 1 whole yellow onion diced into small pieces, 3 cloves garlic cloves minced, and 1 tsp dried thyme. Season generously with 1.5 tsp salt and 0.5 tsp black pepper, mixing until everything is evenly coated. This step ensures every bite gets that savory depth we're after.
Create the Crispy Celery Topping
In the same skillet (no need to clean it—the flavorful bits will add depth), melt the 0.5 cup butter over medium heat. Add the 3 whole celery stalks diced for crispy topping and cook for 5-6 minutes until softened but still retaining some texture.
Reduce heat to medium-low and whisk in the 0.5 cup all-purpose flour gradually, stirring constantly for 1-2 minutes until you have a smooth, thick paste. This forms the base for our crispy topping. Pour in the 1 cup whole milk and 0.5 cup heavy cream, whisking vigorously until completely smooth. The mixture should thicken noticeably as it cooks.
Assemble the Casserole Layers
In a 9x13-inch baking dish, combine the 2 cups long-grain white rice with the 2 cups chicken broth. Stir gently to distribute the broth evenly without breaking the rice grains. Spread the chicken and ham mixture evenly over the rice, pressing down lightly to create a compact layer.
Pour the celery-milk mixture evenly over the chicken layer, spreading it to the edges. The liquid should just barely cover the chicken—this ensures proper steaming without making the casserole soggy. Sprinkle the 1 cup shredded cheddar cheese evenly over the top, pressing it gently into the mixture so it melts into every layer.
Bake to Golden Perfection
Cover the baking dish tightly with aluminum foil and bake at 350°F for 45 minutes. After this initial baking time, remove the foil and increase the oven temperature to 400°F. Return to the oven for an additional 15-20 minutes until the celery topping turns a beautiful golden brown and the edges are crispy.
Here's where the magic happens: the high heat at the end creates that perfect crispy topping while keeping the rice and chicken moist. For the best results, let the casserole rest for 10 minutes before serving—this allows the flavors to meld completely and makes it easier to slice through the crispy topping.
Pro Tips For Making Chicken Ham And Rice Casserole
- Parboil the Chicken First: Toss your chicken breasts in boiling water for 3 minutes before assembling the casserole—this guarantees they’ll cook through without drying out while the rice soaks up the broth. I learned this the hard way when my chicken ended up rubbery after sitting in a watery bath for hours.
- Use Cold Milk: Pour cold whole milk over the rice and chicken mixture instead of warm—it slows down the cooking process just enough to keep the rice from turning mushy. Trust me, your future self will notice the difference when the grains stay fluffy.
- Don’t Overmix the Ham: Stir the diced ham just until it’s evenly distributed, then leave it in chunks—overmixing turns it into a paste and makes the casserole taste like a meatloaf. A few visible pieces of ham add texture and flavor without overpowering the dish.
- Bake Covered, Then Uncovered: Cover the casserole with foil for the first 45 minutes to trap steam, then uncover for the last 15 minutes to let the top brown. Skipping this step leaves you with a sad, pale, and unevenly cooked dish—no one wants that.
Make-ahead tips for chicken ham and rice casserole
Prep Ahead Strategy
Assemble the casserole up to 24 hours in advance and refrigerate uncovered. This allows flavors to meld deeply while preventing sogginess. I always cover it loosely with foil to let some moisture escape—just don’t seal it completely.
The next day, bake as directed but add 10-15 extra minutes covered to ensure even heating from the cold start. 📅
Crispy Topping Hack
Make the celery topping 1 day ahead and store it in an airtight container. Reheat it gently in a skillet over medium-low heat for 3-4 minutes before sprinkling on top—this restores its crispiness perfectly.
I’ve also found that baking it separately on a tray at 400°F for 10 minutes before adding it to the casserole gives an extra crunch boost. ✨
Freezer-Friendly Method
For long-term storage, assemble the casserole (without the crispy topping) and freeze it in a 9x13-inch baking dish for up to 3 months. When ready to serve, thaw overnight in the fridge, then bake as usual—just add 15 extra minutes covered.
Sprinkle fresh celery topping after baking to maintain texture. I always label my freezer containers with the date to track freshness. ❄️
Meal Prep Portions
Divide the fully baked casserole into 6 individual portions for easy grab-and-go meals. Store in glass containers with tight lids to maintain freshness for 4-5 days. Reheat covered with a damp paper towel in the microwave for 2-3 minutes on 50% power—this keeps the rice from drying out.
For best results, always make a fresh crispy topping batch for reheated servings. 💡
Make-Ahead Mistakes
Avoid adding the crispy topping before freezing—it loses texture and becomes soggy. Also, never refrigerate the casserole covered tightly, as this traps moisture and makes the rice mushy. If you’re short on time, I’ve had success using pre-cooked rice (like microwaveable pouches) to cut prep time by 20 minutes.
Just drain it well before assembling. 🚫
Leftovers Revival
Revive day-old leftovers by broiling for 3-5 minutes with a sprinkle of 1 tbsp grated Parmesan on top. This adds a fresh, crispy layer that makes the dish taste like it’s brand new.
For extra flavor, stir in 1 tsp Dijon mustard or a splash of hot sauce when reheating—it’s a game-changer for tired flavors. 🔥
Nutrition facts
Frequently asked questions
Can I use chicken thighs instead of chicken breast?
Chicken thighs add even more flavor and moisture to this casserole. Use 2 lb of boneless, skinless thighs and adjust cooking time to 8-10 minutes until they reach 165°F internally. The skin can be left on for extra richness, but remove it before mixing with other ingredients if desired.
How do I make this casserole without dairy?
Swap the milk and heavy cream for 1.5 cups coconut milk (full-fat for creaminess) and use 1 cup dairy-free cheese shreds. For the crispy topping, replace butter with 0.5 cup olive oil and ensure your flour is dairy-free. The texture will still be rich and satisfying without compromising flavor.
Why is my celery topping not crispy?
Overcooking or insufficient heat are the usual culprits. Bake the topping uncovered at 400°F for 15-20 minutes after removing foil from the main casserole. For extra crunch, bake the celery mixture separately on a tray for 10 minutes before sprinkling it on top.
Can I make this casserole in a smaller dish?
Yes! For a 9x9-inch dish, reduce all ingredients by 25% (about 1.5 cups rice, 1 lb chicken, etc.). Bake times remain the same, but check for doneness 5 minutes early since smaller dishes cook faster. The crispy topping will still work beautifully with adjusted proportions.
What's the best way to reheat leftovers?
Cover with foil and warm in the oven at 350°F for 15 minutes for even heating. For microwave reheating, use 50% power for 2-3 minutes with a damp paper towel covering. Always make fresh crispy topping for reheated servings to maintain texture.