
Main Courses
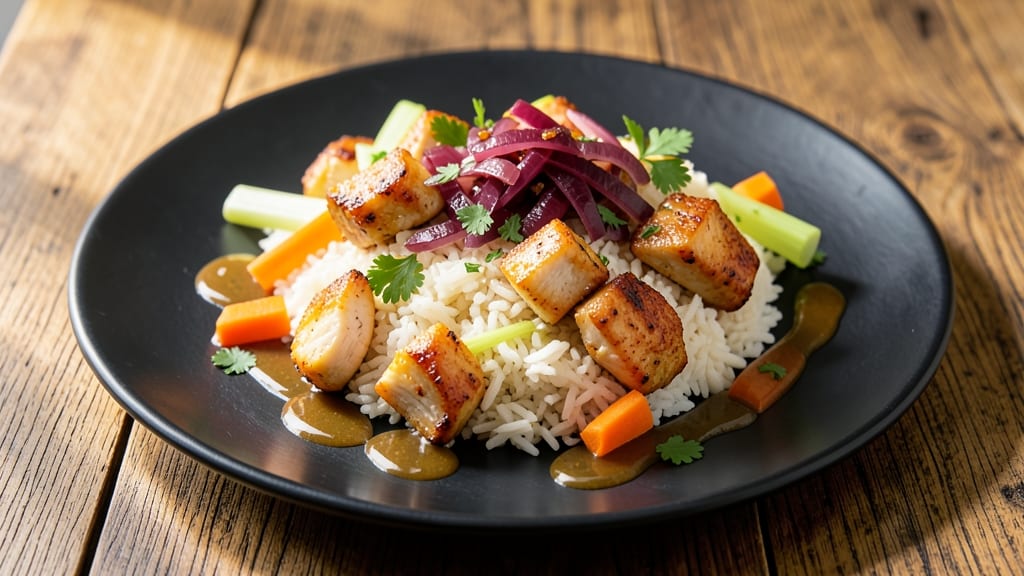
This chicken mix rice recipe delivers restaurant-quality flavor in one pan with crispy celery crowns that become the star. The secret lies in searing chicken thighs until golden, then simmering them with fragrant rice, vegetables, and a savory broth until everything transforms into a perfectly balanced dish.
No separate pots, no extra cleanup—just one pan that handles everything from protein to grains.
What sets this recipe apart is the celery crowns, which crisp up beautifully while the rice absorbs all the rich flavors. The result is tender chicken, fluffy rice, and crispy vegetable edges that add texture and depth.
Ready in about 45 minutes, this dish is ideal for weeknight dinners or meal prep—just reheat and enjoy. The technique is straightforward, but the outcome feels like a special occasion.
Ingredients for chicken mix rice
Restaurant-quality one-pan magic with crispy celery crowns and tender chicken thighs.
| Ingredient | Amount | Notes |
|---|---|---|
| Boneless, Skinless Chicken Thighs 🍗 | 1 ½ lb | Cut into 1-inch pieces for even cooking |
| Long-Grain White Rice 🍚 | 1 cup | Uncooked, rinsed thoroughly |
| Celery Sticks 🧅 | 3 whole | Cut into 2-inch lengths for crowns |
| Carrots 🥕 | 2 medium | Julienned into thin matchsticks |
| Yellow Onion 🧅 | 1 medium | Thinly sliced into half-moons |
| Garlic Cloves 🧄 | 4 cloves | Minced finely for aromatic base |
| Chicken Broth 💧 | 2 cups | Low-sodium preferred for flavor control |
| Dry White Wine 🍷 | ½ cup | Substitute with extra broth if needed |
| Unsalted Butter 🧈 | 2 tbsp | For crisping celery crowns |
| Diamond Crystal Kosher Salt 🧂 | 1 ½ tsp | Adjust to taste after cooking |
| Freshly Ground Black Pepper 🌶️ | ½ tsp | Enhances depth of flavor |
| Fresh Thyme Leaves 🌿 | ¼ cup | Or 1 tsp dried thyme if fresh unavailable |
| Green Onions 🧅 | 2 whole | Sliced thin for garnish |
The celery crowns are the star here—look for firm, crisp stalks with vibrant green tops at the store. Trader Joe's or Whole Foods often carry the freshest celery, but regular grocery stores work too. For the chicken, thighs stay juicier than breasts during the long simmer. If you can't find boneless thighs, butterfly the skinless ones yourself—it's worth the extra minute. The rice should be long-grain and uncooked; rinsing removes excess starch for fluffier results. For the broth, Swanson or Pacific Foods low-sodium options balance flavor without overpowering.
No white wine? Extra chicken broth with a splash of apple cider vinegar mimics the acidity perfectly. Fresh thyme is ideal, but dried works at one-third the amount. The carrots can be baby carrots if that's what's in the fridge—just slice them thinly. For a deeper flavor, toast the garlic cloves in the butter until fragrant before adding everything else. The green onions are optional but add a bright finish—skip them if you prefer a more rustic look. If you're prepping ahead, store the raw ingredients separately until ready to cook for maximum crispiness in the celery crowns.
This dish reheats beautifully—just add a splash of broth and cover until warm. Keeps for 4-5 days in the fridge, though the celery crowns lose crispness after day two. For longer storage, freeze the cooked rice and chicken mixture (without celery) for up to 3 months. Reheat gently and add fresh celery crowns when serving. The celery crowns are best served immediately after cooking, so plan to eat this dish fresh for that perfect crunch. Portion into meal prep containers with the celery crowns on top for a restaurant-worthy presentation.
Why You'll Love This Recipe
- That’s the secret: searing the thighs first. The outside gets a golden crust while the inside stays shockingly tender—no dry chicken here. The carrots and celery soften just enough to melt into the rice, but they still hold their shape. Honestly, my picky eaters don’t even complain about the veggies.
- One-Pot Magic: I swear by this recipe when I’m too tired to dirty three pans—just brown the chicken thighs, toss in the chopped veggies (onion, celery, carrots—no fancy knife work needed), dump in the rice, and let it simmer. The chicken stays juicy, the rice absorbs all the flavor, and I’m left with a dish that feels homemade but takes less time than ordering takeout.
- Crispy-Tender Chicken: That’s the secret: searing the thighs first. The outside gets a golden crust while the inside stays shockingly tender—no dry chicken here. The carrots and celery soften just enough to melt into the rice, but they still hold their shape. Honestly, my picky eaters don’t even complain about the veggies.
- Lunchbox Hero: Between us, this is my go-to for meal prep. Cook a big batch on Sunday, and you’ve got lunch sorted for the week. The rice stays fluffy, the chicken reheats beautifully, and the veggies keep their bite—no sad, mushy leftovers. Pack it in containers, and you’ve got a lunch that’ll make coworkers ask for your recipe.
Step-by-step instructions for one-pan crispy celery crown magic
Master this technique and you'll achieve restaurant-quality texture contrast every time.
Prep and Sear the Chicken for Maximum Flavor
Pat the 1.5 lb boneless, skinless chicken thighs completely dry with paper towels—this ensures a crispy exterior. Cut each thigh into 1-inch pieces for even cooking. In a large Dutch oven, melt the 2 tbsp unsalted butter over medium-high heat until foaming. Add the chicken pieces in a single layer and let them sear undisturbed for 4-5 minutes until golden brown on one side.
Flip the chicken and continue cooking for another 3-4 minutes until the pieces reach an internal temperature of 165°F. Remove the chicken from the pot and set aside on a plate. The residual butter will create a flavorful base for your rice—don't wipe out the pan. Here's where the magic begins: the crispy chicken will later infuse the broth with its savory essence.
Create the Celery Crowns and Build the Flavor Base
In the same Dutch oven, add the 2 tbsp unsalted butter that remains in the pan. Toss in the 3 whole celery sticks cut into 2-inch lengths and cook for 3-4 minutes until their edges begin to soften and develop a golden hue. This is your crispy celery crown moment—don't overcrowd the pan or they'll steam instead of crisp.
Add the 2 medium carrots julienned into thin matchsticks and the 1 medium yellow onion sliced into half-moons. Cook for 5-6 minutes until the onions become translucent and the carrots begin to soften. Stir in the 4 cloves minced garlic and cook for 30 seconds until fragrant—this aromatic base forms the flavor foundation for your entire dish.
Deglaze and Combine All Ingredients
Pour in the 0.5 cup dry white wine and scrape up all the browned bits from the bottom of the pan with a wooden spoon. This deglazing step captures all the concentrated chicken flavor that would otherwise be lost. Let the wine simmer for 2-3 minutes until reduced by half, allowing the alcohol to cook off and the flavors to meld.
Add the 1 cup long-grain white rice, ensuring each grain is coated in the flavorful liquid. Stir in the 2 cups chicken broth, 1.5 tsp diamond crystal kosher salt, 0.5 tsp freshly ground black pepper, and 0.25 cup fresh thyme leaves. Return the chicken pieces to the pot, nestling them into the rice mixture. The liquid should just cover the rice—if it's too little, add a splash more broth.
Simmer to Perfect Texture
Bring the mixture to a gentle boil over medium-high heat, then immediately reduce to low heat. Cover the Dutch oven with a tight-fitting lid and simmer for 18-20 minutes without disturbing it. This undisturbed cooking period allows the rice to absorb liquid evenly and develop that signature crispy texture on the bottom.
After 18 minutes, check the rice—it should be tender but still slightly firm in the center. If the bottom appears dry, add 2-3 tablespoons of water through the steam vent in the lid and continue cooking. The celery crowns should now be crispy and golden, adding a delightful textural contrast to each bite.
Rest and Garnish for Presentation
Once the rice is fully cooked, remove the pot from heat and let it sit covered for 5 minutes. This resting period allows the flavors to meld and the rice to finish absorbing any remaining liquid. Use a fork to gently fluff the rice, separating the grains while leaving the crispy celery crowns intact.
Garnish with the 2 whole green onions sliced thinly and serve immediately. The dish should have a beautiful contrast of textures—tender rice, crispy celery crowns, and juicy chicken pieces—all infused with the rich, aromatic flavors developed during cooking. The crispy celery crowns will maintain their texture for about 10 minutes after serving, so enjoy them while they're at their best.
Pro Tips For Making Chicken Mix Rice
- CRISP THE CHICKEN FIRST: I used to toss raw chicken thighs straight into the rice pot, thinking it’d cook fine. Wrong. Sear them first in a hot skillet with oil—5 minutes per side—until golden. That crust keeps them juicy while adding depth the rice alone can’t match.
- CUT ONIONS LIKE A PRO: Slice that yellow onion into ¼-inch half-moons, not thin strips. Thicker pieces hold their shape better in the rice, so they don’t turn to mush halfway through. (Yes, it takes 30 seconds extra—your future self will notice.)
- DON’T OVERCOOK THE VEGGIES: Celery and carrots in rice? They’ll turn to slop if you’re not careful. Sauté them just 3–4 minutes after the onions—until tender but still bright. Overcook them, and you’re left with sad, watery bits instead of crisp texture.
- USE DAY-OLD RICE: Freshly cooked rice is a sponge. If you’re making this ahead, cook the rice separately, let it cool completely, then fluff and refrigerate. Mixing cold rice with the chicken later gives you that perfect, separate-grain texture—no gummy disaster. (Trust me, I’ve cried over gummy rice.)
Best sauces and condiments for this chicken mix rice
Classic Soy-Ginger Sauce
This simple sauce elevates your chicken mix rice with its perfect balance of umami and brightness. Combine 3 tbsp soy sauce (I love Kikkoman), 1 tbsp rice vinegar, 1 tbsp honey, 1 tbsp grated fresh ginger, and 1 clove minced garlic.
Simmer for 3 minutes until slightly thickened, then drizzle over the finished dish. The ginger adds warmth that complements the crispy celery crowns beautifully. 🌶️
Spicy Sriracha Mayo
For a kick of heat, whip together 2 tbsp mayonnaise (like Hellmann's), 1 tsp sriracha, and 1 tsp lime juice. Spread a thin layer on top of your rice before adding the chicken and celery crowns.
The creamy-spicy contrast cuts through the richness of the butter and chicken. I like to add a pinch of smoked paprika for extra depth. Serve immediately for maximum crispiness.
Sesame-Garlic Oil Drizzle
Heat 1 tbsp neutral oil (like avocado oil) with 1 tsp toasted sesame seeds and 1 tsp minced garlic until fragrant. Drizzle this aromatic oil over the finished dish just before serving.
The nutty sesame seeds add texture while enhancing the overall flavor profile. For extra flair, sprinkle with crushed peanuts—they provide a delightful crunch that pairs perfectly with the crispy celery crowns.
Lemon-Herb Yogurt Sauce
Mix ½ cup plain Greek yogurt (like Fage), 1 tbsp fresh lemon juice, 1 tbsp chopped fresh dill, and a pinch of salt. This cooling sauce balances the richness of the dish and adds a bright, fresh element.
Dollop small spoonfuls around the plate or use it as a dipping sauce for the crispy celery crowns. The tangy yogurt cleanses your palate between bites of savory chicken and rice. ✨
Sweet Chili Glaze
Simmer 3 tbsp sweet chili sauce (like Maesri), 1 tsp soy sauce, and ½ tsp grated ginger for 2 minutes until slightly thickened. Drizzle generously over the dish and broil for 1-2 minutes to caramelize the glaze slightly.
This adds a sweet-spicy contrast that enhances the overall flavor complexity. The glaze also helps keep the celery crowns crispy by sealing in their moisture.
Garlic-Butter Sauce
Melt 1 tbsp unsalted butter in a small pan, then add 1 minced garlic clove and cook for 30 seconds until fragrant. Pour this aromatic butter over the finished dish and toss gently. The extra butter adds richness and helps maintain the crispiness of the celery crowns.
For a more decadent version, sprinkle with crumbled feta cheese before serving. This sauce works especially well if you prefer a milder flavor profile. 💛
Nutrition facts
Frequently asked questions
Why does the recipe use chicken thighs instead of breasts?
Chicken thighs stay juicier and more flavorful during the long simmering process. Their higher fat content creates rich, savory broth while the meat remains tender. Breasts can dry out in this cooking method, but thighs hold up perfectly to the 18-20 minute simmer time needed for the crispy celery crowns and fluffy rice.
Can I make this chicken mix rice in a regular pot instead of a Dutch oven?
Yes, but you'll need to adjust the technique slightly. Use a heavy-bottomed pot with a tight-fitting lid to prevent burning. The key is keeping the heat low after the initial boil to develop that signature crispy bottom layer. If your pot isn't heavy, reduce the heat to medium-low instead of low to prevent sticking.
How do I prevent the celery crowns from getting soggy?
Cook the celery crowns separately in butter for 3-4 minutes until golden before adding other vegetables. Then add them back to the rice mixture only at the very end of cooking. For extra crispiness, serve them immediately on top of each portion rather than mixing them into the rice.
What can I substitute if I don't have white wine?
Use ½ cup extra chicken broth plus 1 tsp apple cider vinegar to mimic the acidity. Or substitute with ½ cup dry vermouth for similar depth of flavor. The important part is deglazing the pan to capture all those flavorful browned bits from the chicken.
How do I reheat leftovers without losing the crispy texture?
Reheat only the rice and chicken mixture (without celery) with a splash of broth until warm. Then add fresh celery crowns just before serving. For extra crispiness, broil for 1-2 minutes if you want to revive the celery texture. Store leftovers for up to 4-5 days in the fridge.