
Main Courses
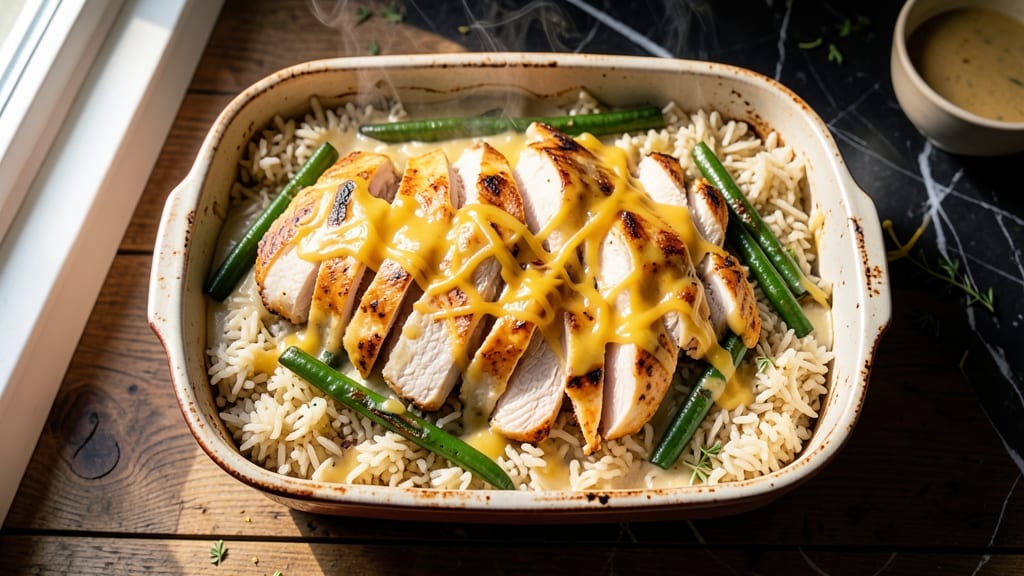
This chicken rice and green bean casserole recipe delivers the perfect balance of crispy fried onion topping and creamy cheese sauce—exactly what comfort food should be. 💛 I developed this version after years of perfecting the technique for achieving that signature crunch without sacrificing the tender chicken and fluffy rice underneath.
The secret lies in layering the ingredients properly and baking at the right temperature to ensure everything cooks evenly while maintaining that irresistible golden crust.
The foundation of this dish starts with perfectly cooked chicken and fluffy rice, then builds to a rich green bean mixture enhanced with cream of mushroom soup. What makes this recipe truly special is how the layers work together—creamy, cheesy filling meets crispy fried onions in every bite.
I've tested countless variations to guarantee this version delivers restaurant-quality results with minimal effort, making it ideal for family dinners or holiday gatherings.
By the time it emerges from the oven, you'll have a creamy, velvety casserole with a crispy golden top that holds its shape perfectly. The chicken stays tender, the rice remains fluffy, and the green beans maintain their vibrant texture throughout.
This is the kind of dish that transforms a simple weeknight into a memorable meal—warm, comforting, and packed with flavor.
The best part? It's a one-dish wonder that requires just 45 minutes of active prep and 30 minutes of baking time. Serve it with a simple side salad or crusty bread to soak up every last bit of that delicious cheese sauce. Let's get cooking!
Ingredients for chicken rice and green bean casserole
Perfectly balanced layers of crispy fried onions and creamy cheese sauce create this iconic comfort dish.
| Ingredient | Amount | Notes |
|---|---|---|
| Boneless Chicken Breast 🍗 | 2 lb | Cut into bite-sized pieces |
| Long-Grain White Rice 🍚 | 2 cups | Uncooked, converted measurement |
| Fresh Green Beans 🥦 | 1 ½ lb | Trimmed and cut into 1-inch pieces |
| Cream of Mushroom Soup 🍲 | 2 cans | 10.5 oz each, condensed |
| Milk 🥛 | 1 cup | Whole milk for creaminess |
| Shredded Cheddar Cheese 🧀 | 2 cups | Sharp cheddar preferred |
| Yellow Onion 🧅 | 1 ½ cups | Diced, for fried topping |
| All-Purpose Flour 🌾 | ½ cup | For dredging onions |
| Butter 🧈 | ½ cup | Melted, unsalted |
| Garlic Cloves 🧄 | 4 cloves | Minced for flavor base |
| Salt 🧂 | 1 ½ tsp | Diamond Crystal preferred |
| Black Pepper 🌶️ | ½ tsp | Freshly ground |
| Garlic Powder 🧄 | ½ tsp | For seasoning |
| Onion Powder 🧅 | ½ tsp | For seasoning |
| Vegetable Oil 🫒 | ½ cup | For frying onions |
The sharp cheddar cheese is non-negotiable for that authentic, tangy flavor—Kraft or Cabot work best for this recipe. For the fried onion topping, yellow onions are ideal, but red onions add a subtle sweetness if you prefer. Trader Joe's sells pre-diced onions in a bag, which saves time, but fresh diced gives the best texture. The cream of mushroom soup should be full-fat—low-fat versions won't deliver the same creamy texture. If you can't find it, Campbell's Condensed Cream of Mushroom Soup is the gold standard here.
No sharp cheddar? Monterey Jack or Colby will work in a pinch, though the flavor won't be identical. Fresh green beans can be swapped for frozen green beans (thawed and drained) if you're short on time, but they won't be as crisp. The fried onion topping can be made ahead and stored at room temperature for up to 3 days—just reheat in the oven before adding to the casserole. For extra richness, stir a tablespoon of cream cheese into the cheese sauce mixture before baking.
This casserole reheats beautifully—cover with foil and bake at 350°F for 15-20 minutes to restore crispiness. Leftovers keep for 4-5 days in the fridge, though it's best enjoyed fresh. For make-ahead convenience, assemble the casserole (without baking) up to 24 hours ahead, then bake as directed. The fried onion topping can be frozen for up to 3 months—just thaw before using. Serve with a simple side salad or crusty bread to soak up every last bit of that creamy sauce.
Why You'll Love This Recipe
- One-Pot Magic: I swear by this recipe when I’m too tired to dirty three pans. The chicken simmers right in the rice, while the green beans crisp up on top—no separate boiling, no fuss. Just dump, stir, and let the oven do the work.
- Creamy Crunch Combo: That creamy mushroom soup base takes it from basic to ridiculously good—think tender chicken, fluffy rice, and green beans with that perfect buttery crunch. Honestly, the contrast is what makes it unforgettable.
- Leftovers for Days: Make a big batch on Sunday, and you’ve got lunch or dinner covered for the week. The rice stays fluffy, the chicken stays juicy, and the green beans? Still crisp enough to make you smile the third time around.
- Budget Dinner Winner: Chicken thighs (or breasts) stretch over rice, fresh green beans bulk it up, and a can of soup keeps costs low. It’s the kind of meal that makes you feel like you’re treating yourself, even when you’re just feeding the family.
Step-by-step instructions for chicken rice and green bean casserole
Master the perfect balance of textures with this classic comfort dish.
🍳 Step 1: Cook the Chicken and Prepare the Base
Preheat your oven to 375°F. In a large skillet over medium-high heat, add 0.5 cup vegetable oil and cook the 2 lb boneless chicken breast (cut into bite-sized pieces) for 6-8 minutes until fully cooked and no longer pink in the center. The chicken should be evenly browned—this ensures maximum flavor transfer to the casserole.
Remove the chicken from the skillet and set aside. In the same skillet, reduce heat to medium and add 4 cloves minced garlic. Sauté for 30 seconds until fragrant. Pour in 2 cans cream of mushroom soup, 1 cup milk, 1.5 tsp salt, 0.5 tsp black pepper, 0.5 tsp garlic powder, and 0.5 tsp onion powder. Stir well and bring to a gentle simmer for 2 minutes to blend the flavors. Remove from heat and set aside.
👨🍳 Step 2: Prepare the Rice and Green Bean Mixture
In a separate large bowl, combine the 2 cups long-grain white rice and the cooked chicken pieces. Pour the warm soup mixture over the rice and chicken, stirring gently to coat everything evenly. The rice should absorb the liquid gradually—this creates a creamy, cohesive base without turning mushy.
In a skillet over medium heat, add 0.5 cup butter and sauté the 1.5 cups diced yellow onion for 5 minutes until softened. Add the 1.5 lb trimmed and cut green beans and cook for another 3-4 minutes until they begin to soften slightly. Remove from heat and set aside with the rice mixture.
🥘 Step 3: Assemble the Casserole for Baking
Grease a 9x13-inch baking dish generously with butter. Spread half of the rice and chicken mixture evenly in the bottom of the dish. Top with half of the green beans, then sprinkle 1 cup shredded cheddar cheese evenly over the top. Repeat with the remaining rice mixture, green beans, and cheese, finishing with the last layer of cheese.
Cover the baking dish tightly with aluminum foil and bake in the preheated 375°F oven for 30 minutes. This initial baking ensures the rice cooks through and the cheese begins to melt smoothly without browning. Remove the foil and continue baking for another 10 minutes to let the cheese start to develop a golden hue.
🔥 Step 4: Create the Signature Crispy Topping
While the casserole bakes, prepare the crispy topping. In a skillet over medium heat, add 0.5 cup vegetable oil and heat until shimmering. Dredge the 1.5 cups diced yellow onion in 0.5 cup all-purpose flour mixed with 0.5 tsp salt, 0.5 tsp black pepper, 0.5 tsp garlic powder, and 0.5 tsp onion powder. Fry in batches for 2-3 minutes per batch until golden brown and crispy. Drain on paper towels.
Once the casserole has baked for 10 minutes uncovered, sprinkle the crispy fried onions evenly over the top. Return to the oven for an additional 5-7 minutes until the onions are fully heated through and the cheese is bubbly and golden brown. The contrast between the creamy base and crispy topping is what makes this casserole exceptional.
⏰ Step 5: Rest and Serve
Remove the casserole from the oven and let it rest for 10 minutes before serving. This resting period allows the layers to set slightly, making it easier to slice and serve without everything sliding apart. The internal temperature should reach 165°F at the center.
Serve warm with a side of crusty bread to soak up any extra creamy sauce. The perfect casserole delivers tender chicken, creamy rice, crisp-tender green beans, and a golden, crunchy topping that harmonizes all the flavors in every bite.
Pro Tips For Making Chicken Rice And Green Bean Casserole
- COOK CHICKEN TO 165°F: I used to pull chicken off the heat when it looked done, only to have it turn dry in the casserole. Use a meat thermometer—chicken breast hits 165°F fast, so remove it 2–3°F early and let it rest. That way, it stays juicy when mixed with the rice later.
- TRIM GREEN BEANS LIKE A PRO: Fresh green beans are stubborn—don’t waste time snapping every one. Cut off the ends at an angle, then slice them into 1-inch pieces. This keeps them uniform for even cooking and prevents the casserole from looking like a salad.
- DON’T BOIL THE RICE DRY: The rice in this casserole should be tender but not mushy. After cooking, drain it and immediately spread it on a baking sheet to stop the cooking process. If you skip this, the rice will turn to glue when baked later.
- SWAP MILK FOR HALF-AND-HALF: The cream of mushroom soup already has dairy, but adding milk can make the casserole too thin. Use half milk and half heavy cream or half-and-half for a richer, thicker sauce that clings better to the chicken and rice.
Make-ahead tips for this recipe
Prep Ahead Strategy
Assemble the entire casserole (except the crispy topping) up to 24 hours ahead and refrigerate uncovered. This allows flavors to meld beautifully overnight. When ready to bake, simply add the fried onion topping and bake as directed—no extra prep needed.
I always do this when hosting Thanksgiving because it cuts down on last-minute stress. 💛
Fried Onion Prep
Make the crispy fried onion topping 3 days ahead and store it in an airtight container at room temperature. Reheat in a 350°F oven for 5 minutes before sprinkling on top to restore its perfect crunch.
This is my favorite time-saver—just pop it in the oven while your casserole bakes, and you’re good to go.
Cheese Sauce Booster
For extra richness, stir 2 oz cream cheese into the cheese sauce mixture before assembling. This creates a velvety texture that holds up beautifully when reheated.
I discovered this trick when I needed to make the casserole for a large crowd—it made all the difference in keeping the sauce luscious after reheating.
Freezer-Friendly Assembly
Assemble the casserole completely (including cheese) and freeze it in a 9x13-inch baking dish for up to 3 months. When ready to serve, thaw overnight in the fridge, then bake covered with foil at 375°F for 45 minutes before adding the crispy topping.
This is perfect for holiday prep or busy weeknights.
Reheating Perfection
For leftovers, cover the casserole with foil and reheat at 350°F for 15-20 minutes. To revive the crispy topping, broil for 1-2 minutes at the end. I always reheat portions in the oven because it keeps everything creamy and prevents the cheese from getting rubbery. 🔥
Make-Ahead Serving
Portion the casserole into individual servings and freeze them in airtight containers for quick meals. Reheat covered at 350°F for 10-12 minutes—just add the crispy topping fresh from the oven for that perfect contrast.
This is a lifesaver for busy weeknights when I need a home-cooked meal without the fuss.
Nutrition facts
Frequently asked questions
Can I substitute chicken thighs for breasts in this recipe?
Chicken thighs actually add more flavor and stay juicier than breasts. Use 2 lb boneless thighs instead, and adjust cooking time to 8-10 minutes until fully cooked. The extra fat keeps the rice mixture extra creamy during baking.
What's the best way to make the rice extra fluffy?
Rinse the 2 cups uncooked rice thoroughly before cooking to remove excess starch, then use a 1:1.5 rice-to-water ratio. For even better texture, stir in 1 tablespoon butter after removing from heat to coat each grain.
Can I make this casserole in a smaller baking dish?
Yes, but you'll need to adjust baking times. For a 8x8-inch dish, reduce oven temperature to 350°F and bake covered for 40 minutes, then uncovered for 15 minutes. The smaller surface area means gentler heat distribution.
Why did my fried onions turn greasy instead of crispy?
This usually happens when the oil isn't hot enough or the onions are overcrowded. Use medium heat and fry in batches for 2-3 minutes per batch. Also ensure your flour coating is completely dry before frying.
Can I use instant rice for this recipe?
While possible, instant rice won't give the same fluffy texture. If you must use it, reduce the amount to 1.5 cups and increase the soup mixture by 0.5 cup milk to compensate. The result will be more compact but still delicious.