
Desserts
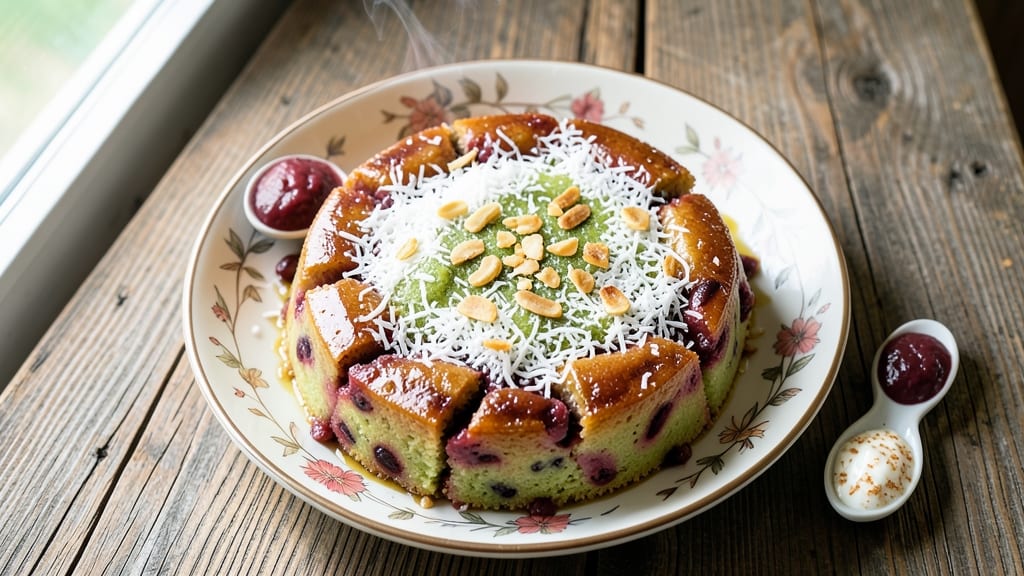
This Chinese sweet sticky rice cake delivers the perfect balance of mochi-style chewiness and velvety texture, a beloved tradition during Lunar New Year celebrations.
The recipe combines glutinous rice flour with coconut milk for a tender yet resilient crumb, topped with a glossy coconut glaze that adds both sweetness and visual appeal.
What makes this dish special is its cultural significance—each bite symbolizes prosperity and good fortune, making it a staple for family gatherings and festive occasions.
The preparation begins with a smooth rice batter that requires precise mixing to achieve that signature elastic texture. Steaming the cake creates a light, airy interior while maintaining a slightly chewy exterior, and layering it with red bean or lotus paste adds a burst of natural sweetness.
The coconut glaze, made from shredded coconut and sugar, caramelizes beautifully, giving the cake its signature golden sheen and rich flavor.
What you’ll end up with is a dessert that’s both impressive and comforting—ideal for sharing with loved ones or enjoying as a special treat. The combination of textures and flavors makes it a standout dessert, whether served at a holiday feast or as a thoughtful gift.
This recipe is perfect for those who appreciate traditional flavors with a modern twist, ensuring every bite is both nostalgic and delightful.
The versatility of this recipe allows for customization—swap the coconut glaze for a peanut or sesame coating, or adjust the sweetness to suit your preference. Whether you’re celebrating a cultural holiday or simply craving a delicious dessert, this sticky rice cake delivers on both tradition and taste.
Let’s get started on creating this timeless treat!
Ingredients for chinese sweet sticky rice cake
Glutinous rice flour and coconut milk create the signature chewy texture for this festive dessert.
| Ingredient | Amount | Notes |
|---|---|---|
| Glutinous Rice Flour 🍚 | 2 cups | Must be 100% glutinous rice flour |
| Coconut Milk (Full-Fat) 🥥 | 13 ½ oz | Canned, full-fat preferred |
| Granulated Sugar 🍚 | 1 ½ cups | White or brown sugar works |
| Red Bean Paste (or Lotus Paste) 🍫 | 1 cup | Store-bought or homemade |
| Shredded Coconut (Sweetened) 🥥 | 1 ½ cups | Unsweetened works too |
| Vegetable Oil 🫒 | 2 tbsp | For greasing steamer |
| Salt 🧂 | ½ tsp | Fine sea salt preferred |
| Vanilla Extract 🌿 | 1 tsp | Pure vanilla extract |
| Baking Soda 🧪 | ¼ tsp | For tenderizing batter |
| Water 💧 | ½ cup | Room temperature preferred |
| Pineapple Juice (Optional) 🍍 | ¼ cup | For extra tenderness |
| Sesame Seeds (Optional) 🌰 | 1 tbsp | For decorative topping |
The glutinous rice flour is non-negotiable—Bob's Red Mill or Asian grocery stores carry the best quality. Look for a fine grind, and if it's clumpy, sift it before mixing. Coconut milk should be full-fat (the canned kind) for that rich flavor. Thai Kitchen or Goya brands work well, but check the fat content. The red bean paste can be store-bought or homemade—just make sure it's smooth, not chunky. For the shredded coconut, unsweetened is fine if you prefer to control the sweetness yourself. If you're using pineapple juice, go for fresh or high-quality canned—Dole or Del Monte are reliable.
No glutinous rice flour? Sweet rice flour works in a pinch, but the texture won't be as chewy. Swap coconut milk for coconut cream plus extra water to mimic the fat content. Running short on red bean paste? Black sesame paste adds a nutty twist. For the glaze, if you can't find sweetened shredded coconut, toast unsweetened coconut with a pinch of sugar. The baking soda is key—it tenderizes the batter, so don't skip it. If you're avoiding pineapple juice, extra water or orange juice works too. The sesame seeds are optional but add a beautiful finish—white or black both work.
The batter keeps in the fridge for 2 days before steaming—perfect for making ahead. Once steamed, the cake stays fresh for 3 days at room temperature, wrapped tightly. For longer storage, freeze portions for up to 3 months. Reheat steamed slices in a dry pan for 30 seconds per side to revive the texture. The glaze can be made a day ahead and reheated gently—just add a splash of water if it thickens too much.
Why You'll Love This Recipe
- Steam-and-Go Magic: Honestly, this recipe is about as hands-off as dessert gets. You mix the glutinous rice flour with coconut milk and sugar—no kneading, no fuss—then steam it for 20 minutes. The red bean paste swirls right in while it cooks, so no extra steps. I’ve made it while scrolling through my phone; it’s that simple.
- Coconut Sugar Rush: That full-fat coconut milk? It’s the secret weapon here. The cake turns out tender and rich, with a subtle caramel sweetness that pairs perfectly with the earthy red bean paste. Top it with toasted shredded coconut, and you’ve got this perfect balance of creamy, chewy, and nutty. My kids fight over the last slice—no joke.
- Leftover Goldmine: Between us, this cake actually improves the second day. The flavors meld even better, and it reheats in seconds (microwave or steam). I make a big batch on Sundays and keep it in the fridge for breakfast or after-dinner snacks. It’s my go-to for lazy mornings or when I need a sweet pick-me-up without effort.
- Pantry Staple Power: Here’s what sold me—the ingredients are all things I already have. Glutinous rice flour, sugar, coconut milk? Basic. Red bean paste is pricey but lasts forever, and you only need a little. No weird substitutions, no last-minute grocery runs. It’s the kind of recipe that turns a "what’s for dessert?" moment into a "oh, we’ve got this" moment.
Step-by-step instructions for Chinese sweet sticky rice cake
Here's the precise method for achieving that signature mochi-like chewiness and glossy coconut glaze.
Prepare the Batter Mixture
In a large mixing bowl, combine the 2 cups glutinous rice flour, 1.5 cups granulated sugar, 0.5 tsp salt, 0.25 tsp baking soda, 1 tsp vanilla extract, and 1 cup red bean paste. Mix these dry ingredients thoroughly with a whisk or silicone spatula until no streaks remain. This ensures even distribution of flavor and texture throughout the batter.
Next, create a well in the center and pour in the 13.5 oz coconut milk and 0.5 cup water. If using, add the 0.25 cup pineapple juice for additional tenderness. Gently fold the wet ingredients into the dry mixture using a spatula, being careful not to overmix. The batter should be thick but pourable - similar to pancake batter consistency. Real talk: If it looks too dry, add 1 tablespoon water at a time until it reaches the proper consistency.
Steam the Batter to Perfect Texture
Grease a bamboo steamer or heatproof dish with 2 tbsp vegetable oil, then lightly coat with the 1.5 cups shredded coconut to prevent sticking. Pour the batter evenly into the prepared steamer, spreading it to about ½-inch thickness. The reason for this thickness is to create that signature chewy texture while maintaining a moist center.
Place the steamer over a pot of boiling water, ensuring the water doesn't touch the bottom of the steamer. Cover tightly with a lid and steam over medium-high heat for 25-30 minutes. You'll know it's done when the top appears set but still slightly sticky to the touch. Don't overcook - the cake should be firm but still slightly translucent at the edges. If you press gently with your finger and it springs back slowly, it's ready.
Create the Coconut Glaze
While the cake steams, prepare the glaze by combining the remaining 1.5 cups shredded coconut with 0.5 cup water in a small saucepan. Cook over low heat, stirring constantly, until the mixture reaches a thick, syrupy consistency - about 5-7 minutes. The glaze should coat the back of a spoon and have a glossy appearance. If it's not thick enough, continue cooking and stirring until it reaches the proper consistency.
Remove the steamed cake from the pot and let it cool for 10 minutes. This resting period allows the cake to set properly before glazing. The cake should still be warm but not hot to the touch. This is the moment that matters: if you glaze it too soon, the coconut mixture will melt into the cake rather than create that beautiful, glossy coating.
Apply Glaze and Garnish
Working quickly, pour the coconut glaze evenly over the warm cake, spreading it to the edges with a spatula. The heat from the cake will help the glaze adhere immediately. Immediately sprinkle the 1 tbsp sesame seeds evenly over the top for decorative contrast and added crunch. The sesame seeds should stick to the glaze rather than sinking into the cake.
Let the cake cool completely at room temperature before slicing. The cooling process allows the flavors to meld together and the texture to develop fully. Once cooled, you'll achieve that perfect balance of chewy interior and crispy, glossy exterior. Each slice should have a beautiful golden-brown color with the coconut glaze peeking through the edges, promising that signature sweet coconut flavor with every bite.
Pro Tips For Making Chinese Sweet Sticky Rice Cake
- STEAM AT 212°F: The rice cake’s texture hinges on steady heat—no boiling, no lukewarm water. Use a pot with 1-2 inches of water and a tight lid; if your stove runs hot, reduce to medium-low. I learned this after my first batch turned out gummy because I assumed "gentle steam" meant half-power. It doesn’t.
- SIFT THE FLOUR: Glutinous rice flour clumps like stubborn glue if you skip this. Sift it directly into your mixing bowl with the sugar and coconut milk, then whisk aggressively for 30 seconds to dissolve lumps. I used to just stir, and the final cake had dry pockets—like eating a dessert with hidden sand.
- LAYER COCONUT LAST: Add the shredded coconut to the top of the steamed cake, not mixed in. Press it lightly into the top ½ inch so it caramelizes and stays crispy. Mixing it in turns it soggy—like biting into a mushy rice pudding instead of a textural surprise. (Yes, even if you’re impatient to eat it.)
- CHILL THE BATTER: Let the batter rest uncovered in the fridge for 15 minutes before steaming. This lets the flour absorb the coconut milk fully, preventing cracks when it steams. I skipped this once and ended up with a cake that split like a fault line—ugly, but still edible. Still not worth it.
Creative variations of these flavors
Lunar New Year Tradition
The original version of this cake, called Nian Gao (年糕), symbolizes prosperity and good fortune in Chinese culture. During Lunar New Year, families serve it to invite wealth for the coming year. The sticky texture represents resilience, while the round shape signifies unity and completeness.
In some regions, people even use the cake to "knock" on doors for luck—literally tapping it against doorframes for good energy. 🌟
Peanut Butter Twist
Swap the coconut glaze for a peanut butter glaze by mixing ½ cup creamy peanut butter, ¼ cup honey, and 1 tbsp coconut oil. Heat gently until smooth, then drizzle over the warm cake.
Top with crushed peanuts for texture. This variation is popular in Southeast Asian households where peanuts are more accessible than coconuts.
Black Sesame Version
Replace the red bean paste with black sesame paste (about 1 cup) for a nutty, earthy flavor. Use the same coconut glaze or make a sesame glaze by blending ½ cup toasted black sesame seeds, 2 tbsp sugar, and 1 tbsp water into a paste.
This version is especially beloved in Taiwan and Northern China.
Coconut-Jasmine Tea Infusion
Add 1 tbsp jasmine tea leaves to the coconut milk while heating (before mixing with the batter). Let it steep for 5 minutes, then strain.
This infusion adds a delicate floral note that pairs beautifully with the coconut. Garnish with edible jasmine flowers for an elegant touch—perfect for special occasions.
Mini Bite-Sized Buns
Divide the batter into 12 small portions and shape into tiny balls. Steam for 15-20 minutes in a mini steamer or lined muffin tin. Once cooled, roll them in crushed pistachios or toasted coconut for a festive snack.
These are ideal for children’s parties or as a sweet appetizer during gatherings.
Matcha Green Tea Fusion
Replace ½ cup of the red bean paste with matcha green tea powder mixed with 1 tbsp sugar and a splash of water. This creates a vibrant green swirl in the cake.
Top with a white chocolate glaze (melt ½ cup white chocolate with 1 tbsp coconut milk) for a modern, Instagram-worthy twist. 💚
Nutrition facts
Frequently asked questions
Why does this sticky rice cake need to rest before slicing?
The 10-minute rest after steaming is crucial for developing the perfect texture. This allows the cake's structure to firm up slightly while keeping it moist inside. If you slice too soon, the layers may separate and the glaze won't adhere properly. Think of it like letting bread cool - patience ensures that signature chewy yet tender bite.
Can I make this cake without a bamboo steamer?
Use a heatproof dish that fits your pot with a tight lid. Line it with parchment paper or lightly grease with oil to prevent sticking. The key is maintaining steady medium-high heat and ensuring the water doesn't touch the bottom. A metal colander with a plate underneath works too - just keep the lid on tight.
What's the best way to store leftovers?
Wrap tightly in plastic wrap and store at room temperature for up to 3 days. For longer storage, freeze slices between parchment paper for 3 months. To reheat, warm in a dry pan for 20-30 seconds per side - this revives the chewy texture beautifully. The coconut glaze stays fresh too, though it may harden slightly.
Why did my cake turn out too dry?
Oversteaming is the most common cause. Remove the cake when the edges are set but still slightly sticky (25-30 minutes max). Another possibility is using too much flour - measure carefully and don't substitute regular flour for the glutinous variety. For extra moisture, add 1 tbsp extra coconut milk to the batter.
How can I make this cake gluten-free?
Replace the glutinous rice flour with 1:1 gluten-free rice flour blend (like Bob's Red Mill). Add ½ tsp xanthan gum to improve texture. The steaming time may need adjustment - check at 20 minutes as gluten-free versions often cook faster. The coconut glaze remains the same, but expect a slightly denser texture.