
Side Dishes
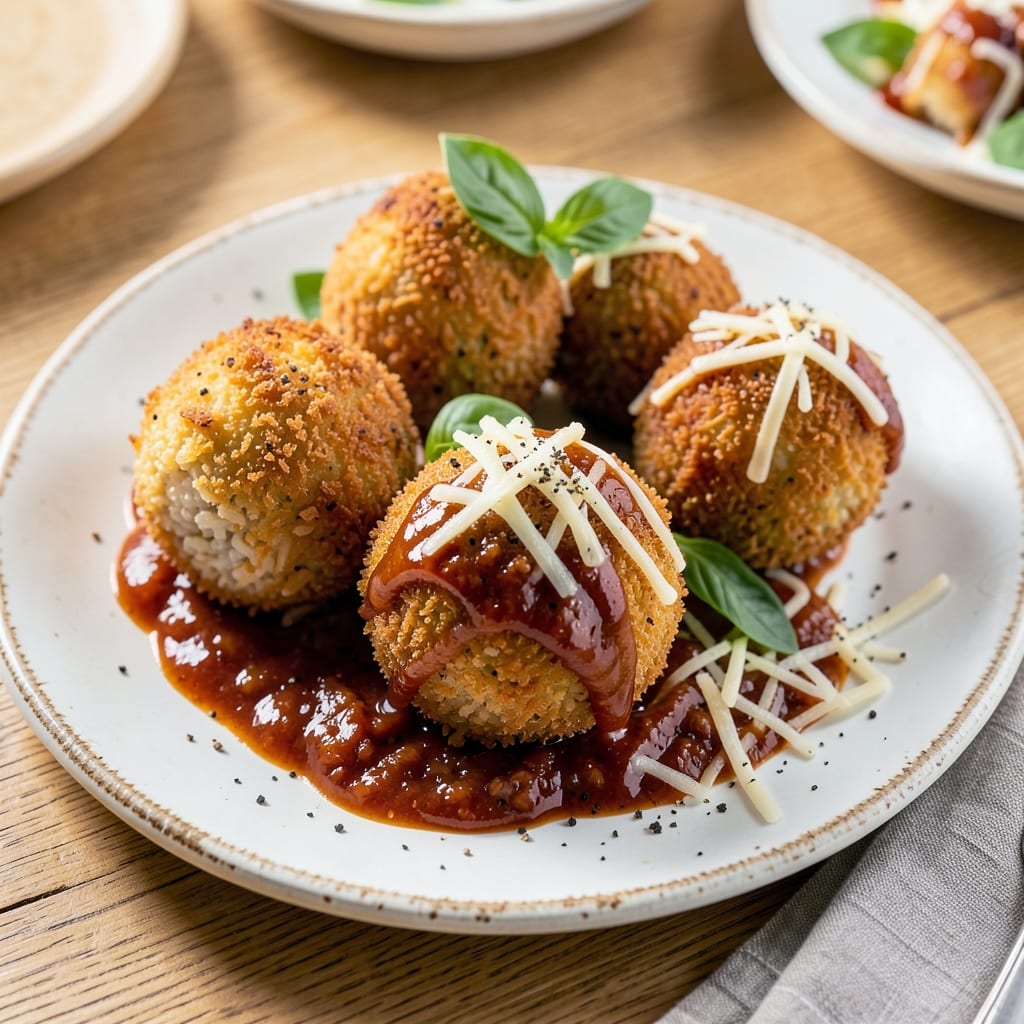
Transforming leftover rice into crispy golden arancini with melty cheese hearts is one of my favorite ways to repurpose dinner scraps into something extraordinary. ✨ The secret lies in the perfect balance of texture—crunchy on the outside, creamy and gooey within—achieved through precise shaping and frying techniques that I’ve perfected over years of testing.
This arancini recipe uses simple ingredients you likely already have on hand: leftover rice, mozzarella, ragù (or peas for a vegetarian twist), and a light batter for that signature golden crust. The key to success is working with cold rice—it holds its shape better—and using a thermometer to monitor the oil temperature for perfect frying every time.
What you’ll end up with is a plate of crispy, bite-sized arancini that burst with flavor in every bite—creamy mozzarella oozing out as you take your first taste, followed by the rich, savory notes of ragù or the bright sweetness of peas. These are the kind of bites that disappear faster than you can say "second helping."
Serve them warm as an appetizer, snack, or even a side dish—they’re versatile enough to fit any meal. Let’s get started on turning your leftover rice into something truly special.
Ingredients for arancini recipe leftover rice
Repurpose leftover rice into crispy, golden arancini with melty cheese centers—simple ingredients, extraordinary results.
| Ingredient | Amount | Notes |
|---|---|---|
| Cold Leftover Rice 🍚 | 4 cups | Day-old, dry, not sticky |
| Shredded Mozzarella Cheese 🧀 | 2 cups | Freshly shredded, low-moisture |
| Ragù Sauce 🍅 | 1 ½ cups | Homemade or quality jarred |
| Large Eggs 🥚 | 2 whole | Room temperature for batter |
| All-Purpose Flour 🌾 | 1 cup | Fine sifted for light batter |
| Baking Powder 🧂 | 1 tsp | For crispiness |
| Salt 🧂 | ½ tsp | Fine sea salt |
| Vegetable Oil 🫒 | 3 cups | For deep frying |
| Parmesan Cheese 🧀 | ¼ cup | Freshly grated, for coating |
| Fresh Basil Leaves 🌿 | ¼ cup | Chopped, for garnish |
| Garlic Cloves 🧄 | 2 cloves | Minced, for flavor boost |
| Peas (optional) 🌱 | ½ cup | For vegetarian option |
The rice is non-negotiable—it needs to be cold and dry (day-old works best) to hold its shape. Grab any leftover rice from your fridge, but avoid anything mushy or wet. For the mozzarella, freshly shredded is a must—pre-shredded gets clumpy and won’t melt right. I always buy a block and shred it myself. The ragù can be homemade or store-bought (like Rao’s or Barilla), but avoid watery versions—thick is key. If you’re vegetarian, swap the ragù for peas or sun-dried tomatoes.
No Parmesan? Skip it or use nutritional yeast for a cheesy flavor without the dairy. Short on basil? Dried oregano works in a pinch, but fresh is ideal. The oil temperature is critical—use a thermometer to keep it at 350°F. If you don’t have one, test with a bread cube: it should sizzle and turn golden in 30 seconds. For the batter, sift the flour to avoid lumps—this keeps the arancini light and crispy. And trust me, room-temperature eggs blend better into the batter.
Store leftover arancini in an airtight container for up to 3 days—they’re best reheated in a 350°F oven for 5-7 minutes to restore crispiness. Freeze extras on a tray first, then transfer to a bag for up to 3 months. I always make a double batch—they disappear fast! For extra crunch, sprinkle Parmesan and breadcrumbs on top before frying.
Why You'll Love This Recipe
- No Chopping Needed: I swear by this trick—just break up cold rice with my fingers while mixing in ragù and cheese. No knives, no stress, just hands-on simplicity that still feels like a proper meal.
- Crispy-Creamy Magic: That golden crust from the egg wash and flour? Absolute perfection. Inside, it’s gooey mozzarella and rich ragù melting into the rice—like a hug in bite-sized form.
- Party in a Pan: Make a double batch, fry half now, and freeze the rest. When guests show up, you’ve got warm, crispy arancini ready in minutes—no last-minute takeout needed.
- Leftovers? More Like Gold: Turn stale rice into something irresistible. I’ve saved entire meals this way—just reheat in the air fryer or oven, and nobody will guess they’re yesterday’s dinner. Budget win.
Step-by-step instructions for arancini recipe leftover rice
Let's transform your leftover rice into irresistible golden arancini with gooey cheese centers.
👨🍳 Step 1: Create the Filling Mixture
In a large bowl, combine the 4 cups cold leftover rice, 1.5 cups ragù sauce, 0.5 cup peas (if using), 2 cloves minced garlic, and 0.25 cup chopped fresh basil leaves. Mix gently but thoroughly with your hands to distribute the sauce evenly throughout the rice.
Here's the thing—you want the rice to be cold and completely dry. If it's sticky, spread it on a baking sheet and refrigerate for 15-20 minutes to firm up. The filling should hold together when pressed into a ball, but not be compacted too tightly. Add a pinch more salt if needed to enhance the flavors.
🥘 Step 2: Prepare the Breading Station
In a separate shallow bowl, whisk together the 1 cup all-purpose flour, 1 tsp baking powder, and 0.5 tsp salt. This dry mixture is your secret weapon for achieving that perfect crispy exterior. I like to sift it first to remove any lumps that could make the coating uneven.
In another bowl, beat the 2 whole large eggs until just combined. The eggs will help bind the breading to the arancini. For extra flavor, you can add 0.25 cup freshly grated parmesan cheese to the egg mixture—this gives each bite that extra umami punch we all love.
🍳 Step 3: Assemble and Bread the Arancini
Working with one piece at a time, take about 1.5 tablespoons of the filling mixture and roll it into a ball between your palms. Press gently to form a smooth surface—this helps the breading adhere better. Dip the ball first into the beaten eggs, allowing any excess to drip off, then roll it thoroughly in the flour mixture, pressing gently to ensure complete coverage.
Place the breaded arancini on a plate and repeat with the remaining filling. Don't rush this step—the more even the coating, the more consistently crispy your arancini will be. I like to work in batches to keep everything organized, especially when making 4 servings at once.
🔥 Step 4: Fry to Golden Perfection
Heat the 3 cups vegetable oil in a deep pot to 350°F—this is crucial for getting that beautiful golden-brown crust without burning the inside. Use a thermometer to monitor the temperature carefully; oil that's too hot will cook the outside too quickly before the inside is done.
Fry the arancini in batches of 4-5 pieces at a time to avoid overcrowding, which lowers the oil temperature. Turn them gently with a slotted spoon and fry for 3-4 minutes until they're golden brown on all sides. They're ready when they float to the surface and maintain their shape when tested with a skewer. Remove with a slotted spoon and drain on a wire rack or paper towels.
🍽️ Step 5: Serve Immediately
Serve the arancini right away while they're still piping hot and crispy. The contrast between the crispy exterior and the molten mozzarella center is what makes these little bites so magical. For an extra touch, sprinkle with additional freshly grated parmesan cheese and chopped basil leaves right before serving.
These arancini are best enjoyed immediately, but if you need to hold them for a few minutes, keep them warm in a 200°F oven on a wire rack to maintain that crispy texture. Remember, the secret to perfect arancini lies in the crispy exterior—don't let them sit too long after frying or they'll lose that coveted crunch.
Pro Tips For Making Arancini Recipe Leftover Rice
- Dry the Rice First: Leftover rice is your enemy here—it’s too wet. Spread it on a baking sheet and let it sit uncovered for 20-30 minutes. Cold rice clumps like glue, and you’ll end up with soggy arancini that fall apart when you fry them. Trust me, this step saves you from disaster.
- Use Freshly Grated Mozzarella: Pre-shredded cheese is packed with anti-caking agents, which means it won’t melt the way real mozzarella does. Buy a block, shred it yourself, and pat it dry with a paper towel before mixing it into the rice. The result? Gooey, stretchy cheese that holds together and tastes like it belongs in an arancini.
- Chill the Mixture Before Frying: I used to rush this, and my arancini would either turn to mush or burn before the inside cooked. Form the balls, then pop them in the fridge for at least 30 minutes. Cold dough means a tighter seal, less mess, and a crust that crisps up properly instead of sticking to the pan.
- Add a Little Cornstarch to the Flour: Skip the breadcrumbs—this isn’t a meatball. Mix 1 tablespoon of cornstarch into your flour for dredging. It gives the coating extra crunch without weighing down the arancini, and it absorbs less oil so your filling stays dry. (Yes, even if you’re impatient like me.)
Dietary considerations for this recipe
Gluten-Free Adaptations
For a gluten-free version, replace the all-purpose flour with a 1:1 gluten-free flour blend like Bob's Red Mill or King Arthur. Add 1 extra tablespoon of cornstarch per cup of flour to help achieve crispiness. I've tested this and found that rice flour works well too—just mix it with xanthan gum (¼ tsp per cup) for binding. Always check labels on your mozzarella and Parmesan to ensure they're certified gluten-free. 🌱
Dairy-Free Options
Skip the mozzarella and use vegan mozzarella shreds like Miyoko's or Violife for a dairy-free center. For extra creaminess, fold in ¼ cup dairy-free cream cheese into the filling mixture. The Parmesan can be replaced with nutritional yeast (¼ cup) for a cheesy flavor without dairy. I've found that vegan arancini still hold together well when fried properly. 🧀
Low-Carb Approach
To make this lower in carbs, use cauliflower rice instead of regular rice—it needs to be cooked and cooled completely first. Mix in ½ cup grated zucchini to help bind the filling. For the breading, use almond flour mixed with 1 egg white (instead of whole eggs) to keep carbs minimal. I've made these with 12g net carbs per serving—still delicious! 🥦
Vegetarian Variations
The classic ragù can be swapped for sun-dried tomatoes, artichoke hearts, or mushroom ragout for a meat-free version. Add ¼ cup chopped spinach or roasted red peppers for extra flavor. I love using white beans (½ cup mashed) to add protein and creaminess to the filling. These vegetarian arancini are just as satisfying as the original! 🌿
Allergen-Friendly Tips
For nut allergies, ensure all flours and breadcrumbs are nut-free. If egg allergies are a concern, use a flax egg (1 tbsp ground flaxseed + 3 tbsp water per egg) in the batter. For soy allergies, use sunflower oil instead of vegetable oil. Always double-check all ingredients—especially store-bought fillings like ragù—to avoid hidden allergens. Safety first! 🛡️
Nutrition facts
Frequently asked questions about arancini
Can I use any type of leftover rice for arancini?
Cold, dry rice works best—avoid sticky or wet rice that won't hold its shape. Basmati or jasmine rice are ideal, but any cooked rice (even risotto) can work if chilled completely. For extra flavor, mix in a pinch of garlic powder or dried herbs to the filling.
Why did my arancini turn out greasy instead of crispy?
Oil temperature is key—keep it at 350°F and avoid overcrowding the pan. If the oil was too cool, the exterior won't crisp properly. Also, make sure your batter is light (sifted flour) and the filling is dry. For extra crunch, double-coat with egg and flour.
How do I make arancini without a deep fryer?
Use a heavy pot with 2-3 inches of oil and a thermometer. For a lighter version, bake at 400°F for 15-18 minutes after coating with egg and breadcrumbs. Brush with oil first for crispiness—just know they'll be less golden than fried.
What's the best way to store leftover arancini?
Keep them in an airtight container for 3 days at room temperature or freeze for 3 months. To reheat, bake at 350°F for 5-7 minutes on a wire rack (not a plate) to restore crispiness. Avoid microwaving—it makes them soggy!
Can I make arancini ahead of time?
Shape them and refrigerate uncooked arancini for up to 2 days before frying. For make-ahead frying, freeze breaded arancini on a tray, then transfer to a bag. Fry straight from frozen, adding 1-2 minutes to cooking time.