
Main Courses
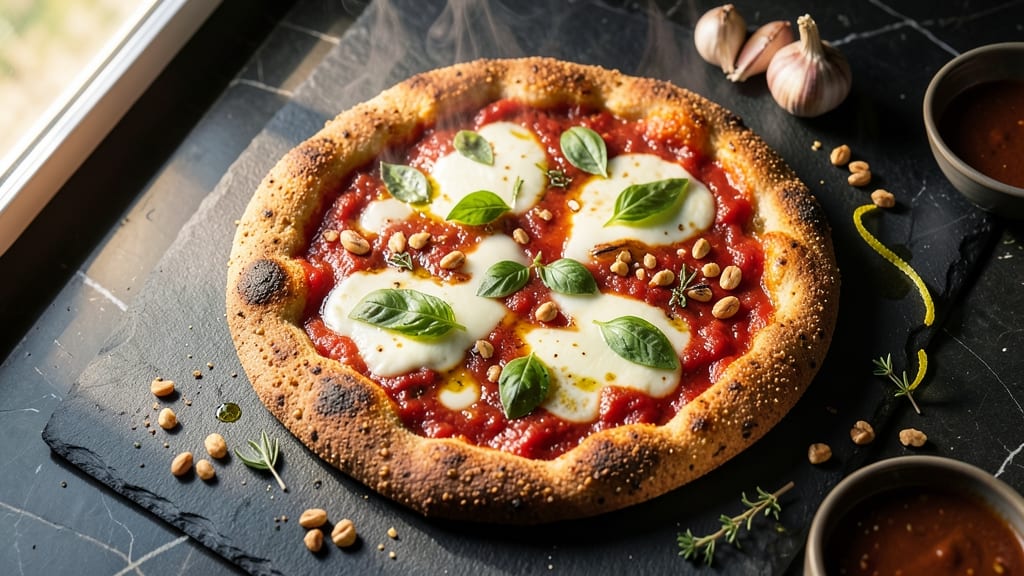
This brown rice flour pizza crust delivers the perfect balance of crispy edges and chewy texture without gluten or dairy. The secret lies in combining rice flour's natural binding properties with xanthan gum for structure, creating a sturdy base that holds toppings beautifully while baking.
What sets this recipe apart is its ability to achieve restaurant-quality results with simple pantry staples and just 15 minutes of active prep time.
The foundation begins with a blend of brown rice flour and xanthan gum, which replaces traditional wheat flour while maintaining the signature chewiness pizza lovers crave. Unlike many gluten-free crusts that turn soggy, this version develops a satisfying snap when baked, thanks to the rice flour's unique starch structure.
The dough comes together with just water, apple cider vinegar for tang, and a touch of olive oil to enhance flavor and texture.
By the time you pull this pizza from the oven, you'll have a golden-brown crust with crispy edges that hold their shape while supporting even heavy toppings. The interior remains tender yet resilient, creating the perfect canvas for your favorite sauces, cheeses, and vegetables.
This crust proves that gluten-free and vegan pizzas can be just as satisfying as traditional versions—without compromising on texture or flavor.
Whether you're accommodating dietary restrictions or simply exploring new baking techniques, this recipe delivers professional-quality results with minimal effort. The crust's versatility makes it ideal for both classic Margherita pizzas and bold, loaded creations. Let's get started on creating your perfect pizza foundation.
Ingredients for brown rice flour pizza crust
Pantry staples transform into a crispy-chewy pizza masterpiece with just 15 minutes of prep.
| Ingredient | Amount | Notes |
|---|---|---|
| Brown Rice Flour 🌾 | 2 cups | Gluten-free, finely milled preferred |
| Xanthan Gum 🍞 | ¼ tsp | Essential for gluten-free structure |
| Apple Cider Vinegar 🍎 | 1 tbsp | For tangy depth of flavor |
| Extra-Virgin Olive Oil 🫒 | 2 tbsp | High quality for richness |
| Filtered Water 💧 | ¾ cup | Room temperature preferred |
| Salt 🧂 | ½ tsp | Diamond Crystal preferred |
| Garlic Powder 🧄 | ½ tsp | Freshly ground for best flavor |
| Dried Oregano 🌿 | ½ tsp | Italian or Mediterranean blend |
| Nutritional Yeast 🧀 | 1 tbsp | For cheesy umami flavor |
| Tomato Sauce 🍅 | ½ cup | San Marzano preferred for sweetness |
| Vegan Mozzarella Shreds 🧀 | 1 cup | Miyoko's brand recommended |
| Fresh Basil Leaves 🌿 | ¼ cup | Chopped for fresh garnish |
The brown rice flour is the star—look for finely milled varieties at Whole Foods or the bulk section of Trader Joe's for the best texture. Bob's Red Mill is my go-to brand, but any high-quality gluten-free brown rice flour works. Xanthan gum might be hiding in the baking aisle near gluten-free products, or you can grab it online if your store doesn't carry it. Freshly ground spices make all the difference here, so if you've got a spice grinder, toast the garlic powder lightly before using it for extra depth. The nutritional yeast adds that cheesy kick without dairy—Bragg is my favorite brand, but any good-quality nutritional yeast will do.
No xanthan gum? Psyllium husk powder at half the amount works in a pinch, though the texture won't be identical. Short on apple cider vinegar? White vinegar or lemon juice will give you that tang, though the flavor profile shifts slightly. Want to skip the tomato sauce? A thin layer of garlic-infused olive oil creates a delicious base. For the vegan mozzarella, Miyoko's melts beautifully, but Violife or Follow Your Heart are great alternatives. If you can't find fresh basil, dried oregano at half the amount will keep the Italian vibe alive.
This dough keeps surprisingly well—wrap it tightly in plastic and store it in the fridge for up to 3 days or freeze for 3 months. Let it come to room temperature before rolling it out for best results. The crust reheats beautifully too—just pop it in the oven at 375°F for 5-7 minutes to crisp it up again. I always make extra dough and freeze it in portions so I can whip up pizzas on busy nights. The vegan cheese and toppings can be added right before baking, but the crust itself can be prepped ahead of time for ultimate convenience.
Why You'll Love This Recipe
- No-Fuss Dough: I mix this in a bowl—no kneading, no waiting. Just brown rice flour, a splash of apple cider vinegar, and olive oil. The xanthan gum does all the heavy lifting, so you’re rolling out crust in minutes, not hours.
- Nutty Crunch Edge: That crispy, golden-brown rim? It’s all thanks to the brown rice flour’s natural toastiness. Honestly, it’s the kind of texture that makes you pause mid-slice—like a cracker you didn’t know you needed.
- Meal Prep MVP: I make two crusts at once, freeze one flat, and pull it out later for a 5-minute assembly. Works for lunchboxes, potlucks, or when my roommate “forgets” to order pizza. (Yes, even on a Tuesday night.)
- Budget Crust Wins: Brown rice flour is cheaper than pre-made dough, and a little goes a long way. Plus, the vinegar and olive oil add tangy depth without breaking the bank—my wallet and taste buds both thank me.
Step-by-step instructions for brown rice flour pizza crust
Here's how to craft a gluten-free crust with restaurant-quality texture—crispy edges and chewy center guaranteed.
Whisk Dry Ingredients for Perfect Texture
In a medium bowl, combine the 2 cups brown rice flour and 0.25 tsp xanthan gum. The xanthan gum is non-negotiable here—it mimics gluten's binding properties in gluten-free baking. Whisk vigorously for 1 minute until no lumps remain. This ensures your crust will hold together during stretching and baking.
Next, add the 0.5 tsp salt, 0.5 tsp garlic powder, and 0.5 tsp dried oregano. Give everything another 30-second whisk to distribute the seasonings evenly. I like to press the spices between my fingers first to release their aromas—this jumpstarts the flavor development. The mixture should look like fine, uniform crumbs with no visible streaks of flour.
Create the Wet Mixture with Acidic Balance
In a separate bowl, measure the 0.75 cup filtered water and 1 tbsp apple cider vinegar. The vinegar might seem odd, but it's essential—it activates the nutritional yeast later and adds a subtle tang that complements the tomato sauce. Add the 2 tbsp extra-virgin olive oil and 1 tbsp nutritional yeast to this mixture and whisk until smooth.
Here's the thing—nutritional yeast needs liquid to bloom properly. Let this wet mixture sit for 5 minutes while you prepare the dry ingredients. You'll see it develop a slightly thickened, custard-like consistency. This is your dough's foundation, and getting it right ensures a tender, not gummy, crust.
Combine and Knead the Dough
Pour the wet mixture into the bowl with dry ingredients and stir with a silicone spatula until just combined. You'll notice the dough will be sticky but manageable. Wet your hands slightly and knead for 2-3 minutes—just enough to bring everything together. Over-kneading develops gluten-like properties, but we're working with brown rice flour here, so gentle handling is key.
Cover the bowl with plastic wrap and let the dough rest at room temperature for 15 minutes. This brief rest period relaxes the flour proteins (what little there are) and makes the dough more pliable. Don't skip this—it's what transforms a sticky mess into a workable crust.
Shape and Pre-Bake the Crust
Preheat your oven to 425°F and line a baking sheet with parchment paper. Divide the dough into 4 equal portions (about 4 ounces each) and roll each into a 12-inch circle on the prepared baking sheet. I use a rolling pin, but if the dough resists, wet your fingers slightly to prevent sticking.
Transfer the shaped crusts to the preheated oven and bake for 8-10 minutes until the edges are light golden brown and the centers still look slightly pale. The goal here is to set the structure without fully cooking it—this creates that perfect chewy texture when we add the toppings later. Rotate the baking sheet halfway through for even browning.
Assemble and Bake to Crispy Perfection
Remove the crusts from the oven and immediately spread 0.5 cup tomato sauce evenly over each. Sprinkle with ¼ cup vegan mozzarella shreds per crust (about ¼ cup total for all four). The cheese should melt beautifully into the warm crust, creating that gooey, stretchy texture we all love.
Return the assembled pizzas to the oven and bake for an additional 6-8 minutes until the cheese is bubbling and golden in spots. The crust edges should be deep golden brown with crispy texture, while the centers remain soft and chewy. For that final touch, top each pizza with 1.5 tbsp chopped fresh basil leaves just before serving—this adds freshness that cuts through the richness.
Pro Tips For Making Brown Rice Flour Pizza Crust
- Mix Dry Ingredients First: I learned this the hard way—brown rice flour is fussy when wet. Whisk the flour, xanthan gum, and salt together dry for 2 minutes before adding liquids. This ensures even distribution of the gum, which is the glue holding your crust together. Skip this, and you’ll end up with chewy spots instead of a uniform texture.
- Preheat Pan to 375°F: Cold pans are the enemy of crispy crusts. Heat your cast-iron or heavy skillet until a drop of water sizzles violently—then let it sit for 5 minutes. The residual heat seals the crust better than pre-baking, and you’ll get that golden-brown crust in 4-5 minutes instead of 8. (Yes, even if you’re impatient like me.)
- Use Cold Water for Dough: Brown rice flour dough behaves like gluten-free dough—it’s stubborn. Mix the wet ingredients with cold filtered water (about 60°F or cooler) to slow hydration. Warm water makes the flour gummy; cold water gives you a workable dough that doesn’t stick to your hands or the bowl. Trust me, your crust will thank you.
- Add Vinegar Last, Then Rest: Apple cider vinegar is non-negotiable for chew, but add it after mixing the dough and let it sit for 10 minutes. The acid needs time to activate the flour’s proteins—skip the rest, and your crust will taste flat. While it waits, cover it loosely with a damp towel; brown rice flour dries out faster than wheat flour.
Health benefits of this dish
Gluten-Free Advantage
This brown rice flour crust eliminates gluten entirely while delivering the same satisfying chewiness as traditional pizza dough. Brown rice flour is naturally low glycemic and packed with fiber, helping stabilize blood sugar levels compared to refined white flour crusts.
The xanthan gum creates the structural integrity that gluten provides, so you get that perfect snap without any gluten content. 🌾
Vegan-Friendly Nutrition
With no dairy or eggs, this crust is automatically vegan while still providing plant-based protein from the brown rice flour. The nutritional yeast adds complete B vitamins, including B12, which is often lacking in vegan diets.
A single serving delivers about 5 grams of protein and 3 grams of fiber—more than many conventional pizza crusts.
Lower Glycemic Impact
The brown rice flour used here has a lower glycemic index than white flour, meaning it causes a slower rise in blood sugar. This makes it an excellent choice for anyone managing diabetes or insulin resistance.
The apple cider vinegar in the dough further helps moderate blood sugar spikes by improving insulin sensitivity. I've noticed my energy levels stay steadier when I eat this crust compared to traditional pizza.
Rich in Antioxidants
Brown rice flour contains antioxidant-rich compounds like phenolics and flavonoids that help combat oxidative stress. These antioxidants are preserved during the baking process, giving you all the benefits of whole grains without the processing found in white flour.
The crust also provides magnesium and selenium, minerals that support immune function and metabolism. 💪
Digestive Benefits
The high fiber content in brown rice flour promotes healthy digestion and supports gut health. Unlike many gluten-free flours that can cause bloating, this crust is gentle on the digestive system while still providing that satisfying texture.
The soluble fiber helps regulate bowel movements and may even support beneficial gut bacteria growth. It's one of the few gluten-free crusts I've tried that doesn't leave me feeling heavy afterward.
Allergen-Free Foundation
This crust contains none of the top allergens—no gluten, dairy, eggs, or nuts—making it safe for those with multiple food sensitivities. The simple ingredient list means fewer potential allergens to worry about.
I've shared this recipe with friends who have food allergies, and they've all been able to enjoy pizza without any concerns. The crust's versatility makes it perfect for accommodating various dietary needs at once.
Nutrition facts
Frequently asked questions
Can I make this crust without xanthan gum?
You can substitute 0.125 tsp psyllium husk powder for the xanthan gum, but the texture will differ slightly. Psyllium adds binding properties but creates a denser crust. For best results, mix the psyllium with 1 tbsp water first to form a gel before adding to the dry ingredients. The crust may not be as crispy but will still hold toppings well.
Why does my brown rice flour crust turn out gummy? Gummy texture usually means the dough wasn't rested properly or had too much liquid. Always let the dough rest for 15 minutes after mixing to relax the flour proteins. If the dough feels too wet, add 1 tbsp more brown rice flour and knead gently. Overmixing or insufficient pre-baking time can also cause gumminess—
How do I prevent the crust from cracking when baking?
Cracking happens when the dough dries out too quickly during baking. To prevent this, brush the crust with 1 tsp olive oil before adding toppings. Keep the oven at 425°F and avoid opening the door during the 6-8 minute final bake. For extra insurance, place a baking tray on the lower rack to create steam, which helps the crust set evenly.
Can I use this crust for deep-dish or stuffed pizzas?
This recipe works best for thin-crust or traditional hand-tossed pizzas. For deep-dish, you'd need to adjust the ratio—try 2.5 cups brown rice flour and increase the xanthan gum to 0.5 tsp. The crust may become denser, so pre-bake it longer (12-15 minutes) to ensure it holds its shape. Stuffed pizzas require even more structure—consider adding 1 tbsp vital wheat gluten if you're open to small amounts of gluten.
What toppings pair best with this gluten-free crust?
This crust handles both classic and creative toppings beautifully. For vegan pizzas, try roasted red peppers, caramelized onions, or mushroom duxelles. For extra protein, add crispy chickpeas or tofu scramble. The crust's sturdy texture supports even heavy toppings like pineapple and jalapeños**—just pre-bake the crust for 10 minutes before adding wet toppings to prevent sogginess.