
Soups & Stews
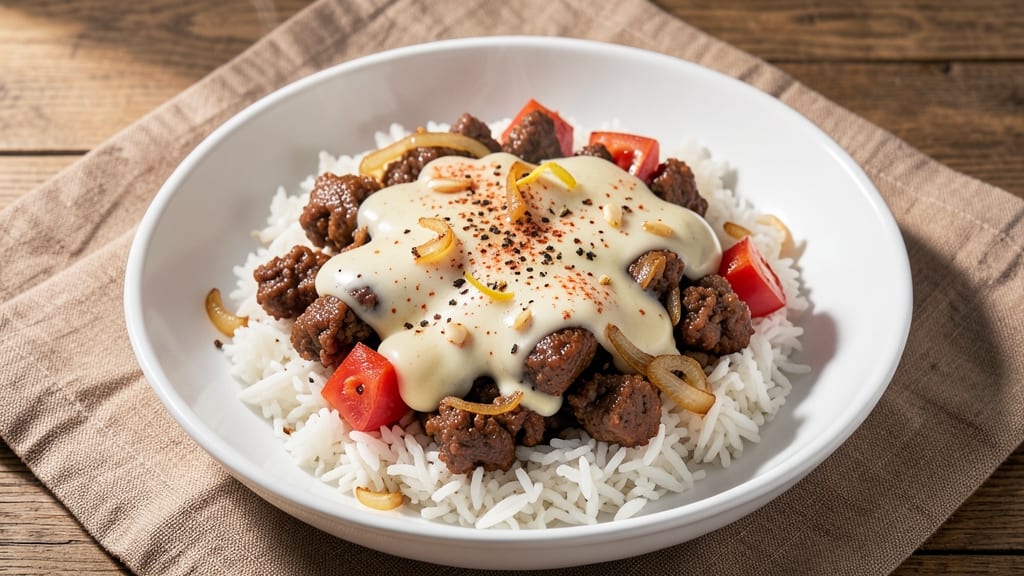
This chili cheese rice recipe delivers all the comfort of your favorite diner dish with a crispy, golden top and melty cheese that makes every bite irresistible. The secret lies in cooking the rice directly in the chili base, then topping it with cheese for that perfect blend of textures and flavors. I've perfected this one-pan method to save time and cleanup while delivering restaurant-quality results.
What sets this recipe apart is the balance of rich, savory chili and creamy, cheesy rice—each component enhancing the other. The ground beef adds hearty protein, while the spices create depth that lingers.
When you broil the cheese topping at the end, you get that coveted crispy crust that turns this into a showstopper dish. It's the kind of meal that feels indulgent yet comes together in under an hour.
Ingredients for chili cheese rice
Pantry staples plus a few key ingredients for that perfect crispy cheese top.
| Ingredient | Amount | Notes |
|---|---|---|
| Ground Beef 🥩 | 1 ½ lb | 80/20 fat ratio preferred |
| White Rice 🍚 | 2 cups | Uncooked, long-grain preferred |
| Onion 🧅 | 1 whole | Medium size, diced small |
| Garlic Cloves 🧄 | 4 cloves | Minced for depth of flavor |
| Canned Tomato Sauce 🍅 | 1 can | 28 oz, San Marzano if available |
| Chili Powder 🌶️ | 2 tbsp | For authentic chili flavor |
| Ground Cumin 🌿 | 1 tbsp | Toasted for richer taste |
| Salt 🧂 | 1 tsp | Diamond Crystal preferred |
| Black Pepper 🌶️ | ½ tsp | Freshly ground for best flavor |
| Shredded Cheddar Cheese 🧀 | 2 cups | Sharp cheddar for best melt |
| Butter 🧈 | 2 tbsp | Unsalted for flavor control |
| Olive Oil 🫒 | 1 tbsp | For crispy cheese topping |
The ground beef is where the flavor starts. 80/20 fat ratio makes it juicier and more flavorful—don't skimp on the fat. I grab mine from Costco for the best price, but any supermarket ground beef works. The San Marzano tomato sauce is worth hunting down if you can find it—it's sweeter and less acidic than regular canned tomatoes. For the rice, long-grain white rice gives you that perfect texture, but jasmine rice works too if you prefer. Just make sure it's not pre-cooked or instant rice, as those won't absorb the chili flavors the same way.
No chili powder? Mix 1 tbsp smoked paprika with 1 tsp cayenne for a close substitute. The cumin is non-negotiable—it's what gives chili its depth. If you're in a pinch, Trader Joe's sells pre-made chili seasoning blends that work in a bind. For the cheese, sharp cheddar melts best, but a mix of cheddar and Monterey Jack adds extra creaminess. If you're watching calories, use half the cheese but broil it longer for that crispy top. The onions and garlic can be swapped for green onions or extra garlic if you love that flavor—just adjust to taste.
This dish tastes even better the next day, so make extra if you can. Store leftovers in the fridge for 4-5 days—the flavors meld beautifully. For freezing, portion it into single servings before adding the cheese topping. That way, you can just reheat and broil the cheese fresh. The best part? You can prep everything ahead of time and just broil the cheese when you're ready to eat. It's the ultimate lazy dinner that still feels indulgent.
Why You'll Love This Recipe
- One-Pot Magic: I swear by this recipe because it’s all in one skillet—no dirty rice cooker or extra bowls. Brown the beef right in the same pan where the rice will cook, and the onions caramelize while you stir. That rich, meaty aroma fills the kitchen before you even add the tomato sauce.
- Cheese-Loaded Comfort: The moment that melted cheddar blankets the rice? Pure satisfaction. I use sharp cheddar (none of that pre-shredded stuff) and let it stretch over the top—crispy in spots, gooey in others. Honestly, the contrast is what makes this dish ridiculously good.
- Lunchbox Hero: Between us, this is my go-to for meal prep because it reheats like a dream. Pack it in containers the night before, and the flavors only get better by day two. My kids grab it for school lunches, and I take it to work—no sad, soggy leftovers here.
- Budget-Friendly Feast: Ground beef and canned tomato sauce keep this recipe from breaking the bank, but it still feels special. I stretch the meat with a little rice at the start, so one pound feeds four easily. Plus, the onion and garlic add depth without costing a fortune—just 10 minutes of chopping for maximum flavor.
Step-by-step instructions for chili cheese rice
Here's how to make this hearty one-pan dish with a perfect crispy cheese crust every time.
Brown the Ground Beef
Heat a large oven-safe skillet over medium-high heat. Add the 1.5 lb ground beef and break it apart with a wooden spoon. Cook until the beef is deep brown and most of the fat has rendered out, about 8-10 minutes. You'll see the meat change from raw to cooked with a rich, caramelized color.
Use a slotted spoon to remove the cooked beef and set it aside on a plate. Leave the rendered fat in the pan—this will be the flavor base for your dish. If the pan looks dry, add 1 tablespoon olive oil to help deglaze later. This step builds the deep, meaty flavor that makes chili cheese rice so satisfying.
Sauté Onions and Garlic
In the same skillet, add 1 whole onion that you've diced small. Cook for 4-5 minutes until the onions soften and begin to turn translucent. Here's the thing—don't rush this step. You want the onions to caramelize slightly for extra sweetness.
Add the 4 cloves garlic cloves that you've minced. Stir for 30 seconds until the garlic is fragrant and just starting to turn golden. Watch it carefully—garlic burns quickly. The combination of onions and garlic will form the aromatic foundation of your dish. If you smell something burning, remove the pan from heat for a moment to cool it down.
Build the Chili Base
Pour in the 1 can canned tomato sauce, scraping up any browned bits from the bottom of the pan. Add 2 tablespoons chili powder, 1 tablespoon ground cumin, 1 teaspoon salt, and 0.5 teaspoon black pepper. Stir everything together and let it simmer for 3-4 minutes until the spices are fully incorporated and the mixture thickens slightly.
Return the cooked ground beef to the skillet and stir to combine. Add 2 cups white rice and mix well to coat each grain with the chili mixture. This ensures every bite will have that perfect combination of meaty chili flavor and rice. The rice will absorb the chili as it cooks, creating a hearty, flavorful base.
Cook the Rice and Prepare the Cheese Topping
Add 2 cups water to the skillet and bring to a boil. Once boiling, reduce heat to low, cover with a tight-fitting lid, and simmer for 20 minutes. Don't peek! Every time you lift the lid, you lose steam and extend the cooking time. After 20 minutes, check the rice—it should be tender with just a slight bite remaining.
While the rice cooks, melt 2 tablespoons butter in a small bowl. In a separate bowl, mix the melted butter with 2 cups shredded cheddar cheese until fully combined. This buttery cheese topping is what creates that irresistible crispy crust. The butter helps the cheese brown beautifully while keeping it melty inside.
Create the Crispy Cheese Topping
Remove the lid from the skillet and spread the buttery cheese mixture evenly over the top of the rice. Use a spoon to create a smooth, even layer—this ensures the cheese cooks uniformly. Place the skillet under the broiler for 3-5 minutes until the cheese is deep golden brown and bubbly.
Here's the moment that matters: watch the cheese closely as it browns. You want it to be golden and slightly crispy on top while still melty underneath. If any spots brown too quickly, move the skillet slightly away from the heat source. Once the cheese is perfectly browned, remove from the broiler and let it rest for 2-3 minutes before serving.
This dish is best served immediately while the cheese is still melty and the rice is hot. The contrast of crispy cheese on top and tender, flavorful chili rice underneath makes every bite irresistible. Enjoy with a side of sour cream or sliced jalapeños if you like a little kick!
Pro Tips For Making Chili Cheese Rice
- Brown the Beef Properly: I learned this the hard way—skipping this step turns your chili cheese rice into a mushy, gray mess. Cook the ground beef over medium-high heat until it loses its raw color and starts to crisp slightly at the edges, breaking it into small, even pieces. This isn’t just for flavor; it’s what keeps your rice from turning into beef-flavored porridge.
- Sweat the Onions Low: High heat caramelizes onions too fast, and you’ll end up with bitter, burnt bits in your dish. Instead, cook them over medium-low heat for 5-6 minutes until they’re translucent but not golden. This softens them just enough to blend seamlessly into the rice—no one wants to taste a crunchy onion surprise in their chili cheese.
- Season the Tomato Sauce Early: Dumping salt and spices at the end won’t cut it. Stir a pinch of salt, black pepper, and a dash of sugar into the canned tomato sauce before mixing it with the rice. This lets the flavors meld while the rice cooks, rather than just sitting on top like afterthoughts. (Yes, even if you’re impatient like me.)
- Use Less Water for Rice: Most recipes call for 2:1 rice-to-water ratios, but chili cheese rice is different. Stick to 1.5:1—this keeps the rice firm enough to hold up to the beef and cheese without turning gluey. If you’re worried about dryness, cover it and check after 10 minutes; you can always add a splash of water if needed.
Make-ahead tips for this recipe
Prep Ahead Strategy
Make the chili base the night before and store it in an airtight container in the fridge. The flavors deepen overnight, and you'll save 30 minutes of cooking time the next day.
Just reheat it on the stove over medium-low heat until hot, then add the rice and proceed with the recipe. 💪
Cheese Prep Shortcut
Shred your cheese the day before and store it in a sealed container in the fridge. This saves 10 minutes of prep time and keeps the cheese fresher.
Mix it with melted butter right before broiling to maintain that perfect melt. I like to use sharp cheddar because it melts beautifully and adds that tangy kick.
Rice Cooking Hack
Cook the rice separately in a rice cooker or pot, then mix it with the chili base. This method gives you more control over the rice texture and prevents the chili from becoming too watery.
Once mixed, transfer everything to an oven-safe dish and top with cheese. Broil for 3-5 minutes until golden and bubbly. ✨
Freezer-Friendly Method
Assemble the entire dish (except the cheese topping) and freeze it in a single layer for up to 3 months. When ready to eat, thaw overnight in the fridge, then add the cheese topping and broil.
The texture stays great, and you get that comforting, home-cooked feeling without the last-minute stress. ❄️
Double Batch for Leftovers
This dish tastes even better the next day, so I always make a double batch. Store leftovers in airtight containers for 4-5 days in the fridge.
Reheat in a skillet with a splash of water or broth to keep it moist, then top with extra cheese and broil for 2-3 minutes to revive that crispy texture.
Broiler Timing Tips
Keep an eye on the broiler—it can vary by oven. Start with 3 minutes and check the cheese. If it's not golden enough, broil for another 1 minute at a time.
The key is getting that perfect balance of crispy on top and melty underneath. A kitchen timer helps prevent over-browning. 🔥
Nutrition facts
Frequently asked questions
Can I use chicken or turkey instead of ground beef?
For chicken, use 1.5 lbs ground chicken or finely diced cooked chicken breast. Turkey works too, but it can dry out faster, so add 1 tablespoon broth when reheating. The cooking time remains the same, but chicken/turkey will have a lighter flavor profile than beef.
Why did my cheese topping get oily instead of crispy?
This usually happens when the cheese melts too quickly without browning. Try these fixes: Use less butter (1 tbsp instead of 2) and broil on medium-high heat for 2-3 minutes first, then finish under the broiler. Also ensure your oven rack is positioned 4-6 inches from the heat source for even browning.
Can I make this vegetarian?
Yes! Replace the beef with 1.5 lbs crumbled tempeh or plant-based ground meat. Add 1 tbsp soy sauce to the chili base for umami depth. For extra protein, stir in 1 can black beans with the rice. The texture will be slightly different but still delicious with the cheesy topping.
How do I prevent the rice from getting mushy?
Don't overcook it! After the initial 20 minutes of simmering, check the rice - it should have a slight bite. If using brown rice, increase cooking time by 5-7 minutes but reduce water by 2 tbsp. For extra insurance, spread the rice evenly in the pan to ensure even cooking.
What's the best way to reheat leftovers?
Transfer leftovers to an oven-safe dish and cover with foil. Heat at 350°F for 10-15 minutes, then remove foil and broil for 2-3 minutes to restore the crispy cheese top. For stovetop reheating, add 1-2 tbsp water or broth** to prevent drying out. Never microwave - it ruins the texture!