
Main Courses
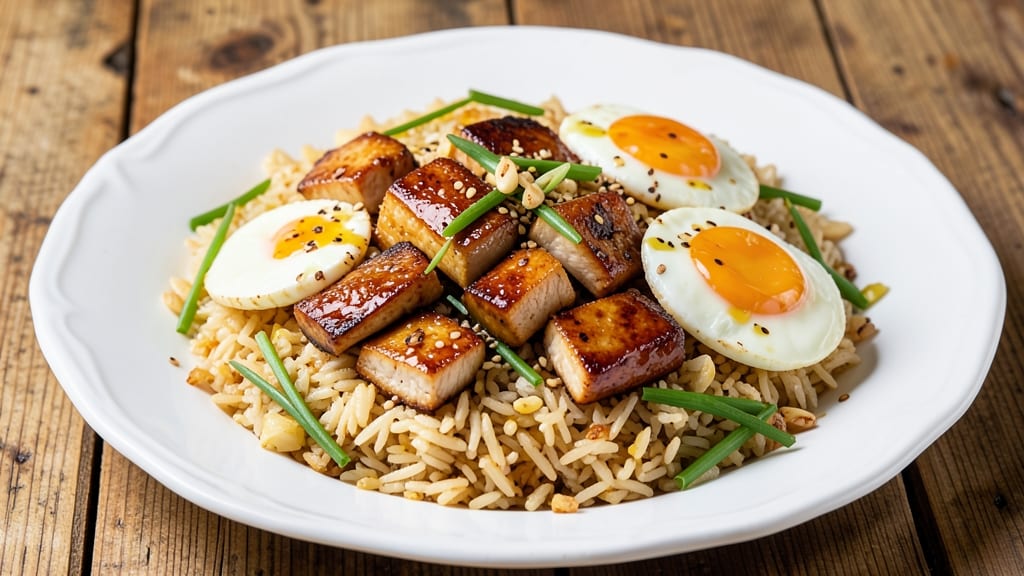
This chicken fried rice recipe list transforms a simple wok meal into five unforgettable variations that prove home cooking can be both bold and effortless. 🌟 The key lies in technique—high heat, quick cooking, and the right balance of textures—all while letting each recipe shine with its own unique flavors.
I spent years perfecting these methods, learning from my grandmother's intuitive approach to cooking by feel rather than rigid measurements.
From the classic Chinese-style version with its signature soy-scallion aroma to modern twists like spicy Thai basil or Korean kimchi fried rice, each recipe delivers a complete dish with crispy edges, tender chicken, and perfectly cooked grains.
The secret weapon? Wok hei—those smoky, breath-of-fire flavors that elevate every bite. These recipes work for weeknight dinners or weekend gatherings, always delivering restaurant-quality results without the fuss.
What makes this collection special is how each variation builds on the same foundational technique while offering completely different flavor profiles. You'll master the art of stir-frying while exploring global influences, all using simple ingredients and straightforward steps.
Whether you're cooking for one or feeding a crowd, these fried rice recipes prove that a single pan can create endless possibilities.
The best part? Every recipe includes practical tips for adjusting heat, protein prep, and plating that ensure success every time. No more guesswork—just delicious, flavor-packed fried rice that tastes like it came from a bustling city wok or a home kitchen. Let's get cooking!
Ingredients for chicken fried rice recipe list
High-heat technique meets global flavors in these five fried rice variations, each built on the same foundational wok method.
| Ingredient | Amount | Notes |
|---|---|---|
| Day-Old Cooked White Rice 🍚 | 4 cups | Cold, preferably from previous day |
| Boneless Chicken Breast 🍗 | 1 ½ lb | Cut into 1-inch cubes |
| Large Eggs 🥚 | 2 whole | Beaten lightly for binding |
| Green Onions 🧅 | ½ cup | Sliced thin, white and green parts |
| Garlic Cloves 🧄 | 4 cloves | Minced finely for aroma |
| Sesame Oil 🫒 | 1 tbsp | For authentic aroma (toasted) |
| Light Soy Sauce 🥫 | ½ cup | Low-sodium preferred |
| Dark Soy Sauce 🥫 | 1 tbsp | For deep color and flavor |
| Vegetable Oil 🫒 | 3 tbsp | High smoke point for wok |
| Frozen Peas 🌱 | ½ cup | Thawed for texture contrast |
| Diamond Crystal Kosher Salt 🧂 | ½ tsp | Fine grain for seasoning |
| Ground Black Pepper 🌶️ | ¼ tsp | Freshly ground for heat |
| Thai Chili Paste 🌶️ | 1 tbsp | For spicy Thai basil version |
| Kimchi 🥬 | ½ cup | Chopped for Korean variation |
| Fresh Thai Basil 🌿 | ¼ cup | Chopped for Thai version |
The rice is non-negotiable—day-old, cold grains create the perfect texture. Jasmine or long-grain white rice works best, and Trader Joe's or Whole Foods carry pre-cooked varieties if you're short on time. Chicken should be cut uniformly—1-inch cubes ensure even cooking. For the Thai basil version, Thai Kitchen brand chili paste delivers the right balance of heat and complexity, while Gochu-jang (Korean chili paste) elevates the kimchi fried rice. Green onions add freshness, but scallions work in a pinch if that's what you have on hand. The secret weapon here is the sesame oil—use the toasted variety for authentic aroma without overpowering flavors.
No sesame oil? Toasted peanut oil at half the amount mimics the nutty depth. Substitute dark soy sauce with 1 tbsp molasses plus 1 tbsp soy sauce for color. For the Thai basil version, if you can't find Thai basil, holy basil or regular basil with extra garlic works. The kimchi fried rice can use store-bought kimchi (like Goya or Bubbap brands) for convenience. Fresh peas? Frozen works just as well—no need to thaw completely. The beaten eggs add richness but can be omitted for a vegetarian version, replacing with 1 tbsp nutritional yeast for umami depth. Always taste as you go—adjust soy sauce ratios based on your wok's heat intensity.
Rice reheats beautifully—microwave 2 minutes with a splash of water to restore texture. Store components separately: rice in airtight container for 3 days, chicken and veggies 2 days. For the Thai basil version, freeze the chili paste in ice cube trays for single-use portions. The kimchi fried rice tastes even better the next day as flavors meld. Prep ahead by cooking all proteins and chopping veggies in advance—this is a make-ahead-friendly recipe that shines when assembled quickly over high heat. Keep your wok well-seasoned for optimal wok hei—flaxseed oil works well for seasoning new woks.
Why You'll Love This Recipe
- No Leftover Waste: I swear by using day-old rice—it’s drier, soaks up flavors better, and saves me from throwing out yesterday’s meal. Plus, the texture? Chef’s kiss. That slight firmness turns mushy rice into a perfect canvas for crispy chicken and eggs.
- Garlic-Green Onion Magic: Between us, the secret’s in the aromatics. A handful of chopped green onions and minced garlic fried until fragrant? That’s the difference between fried rice and ridiculously good fried rice. My kids actually ask for seconds now.
- Lunchbox Hero: Pack this for work or school—it reheats like a dream and keeps flavors intact. (Yes, even on a Tuesday night.) Toss in some soy sauce and sesame oil before packing, and you’ve got a meal that’s basically a hug in a container.
- Budget-Friendly Powerhouse: Chicken breast stretches further than you’d think, and eggs bulk it up without breaking the bank. Honestly, I make this when I’m pinching pennies, and no one ever complains—because it’s that satisfying. Leftovers? Even better.
Step-by-step instructions for flavor-packed chicken fried rice
Master this versatile technique to create restaurant-quality fried rice with bold flavors and perfect texture.
🍳 Step 1: Prep and Sear the Chicken
Cut the 1.5 lb boneless chicken breast into 1-inch cubes—uniform size ensures even cooking. Heat 2 tablespoons vegetable oil in a wok or large skillet over medium-high heat until shimmering. Add the chicken in a single layer and cook undisturbed for 3-4 minutes until golden brown on one side.
Flip the chicken pieces and cook another 3-4 minutes until fully cooked through and reaching an internal temperature of 165°F. Remove the chicken from the wok and set aside on a plate. The residual heat will keep it warm while you prepare the rest of the components. Here's the thing—don't overcrowd the pan, or the chicken will steam instead of sear.
👨🍳 Step 2: Scramble the Eggs and Prep Aromatics
In the same wok (no need to clean it—the fond adds flavor), reduce heat to medium and add 1 tablespoon vegetable oil. Pour in the 2 beaten eggs and scramble vigorously for 30-45 seconds until just set but still slightly moist. Remove the eggs and set aside with the chicken.
While the eggs cook, prep the aromatics: slice the 0.5 cup green onions into thin rounds (separate white and green parts if desired) and mince the 4 garlic cloves until finely chopped. Keep these separate for now—we'll add them at precise moments for maximum flavor impact.
🔥 Step 3: Stir-Fry the Base Ingredients
Return the wok to high heat and add the remaining 1 tablespoon vegetable oil. Toss in the 4 minced garlic cloves and cook for 10-15 seconds until fragrant—don't let them burn. Immediately add the 0.5 cup frozen peas and stir-fry for 1 minute until they begin to soften but still retain their bright green color.
Add the 4 cups day-old cooked white rice, breaking up any clumps with your spatula. Stir-fry for 2 minutes, using the heat to dry out the rice slightly—this prevents a mushy texture. Here's where it gets critical: the rice should be hot but not crispy. You're aiming for a texture that's firm yet tender, with just enough bite.
🥘 Step 4: Combine and Season
Return the chicken and eggs to the wok. Pour in the 0.5 cup light soy sauce, 1 tablespoon dark soy sauce, and 1 tablespoon sesame oil. Add 0.5 tsp diamond crystal kosher salt and 0.25 tsp ground black pepper. Toss everything together vigorously for 2-3 minutes until the rice is evenly coated and heated through.
This is the moment that matters: taste and adjust seasoning. The dark soy sauce should give the rice a deep mahogany color, while the light soy sauce adds umami depth. If it needs more salt, add it now—you can't fix bland fried rice later. The rice should be hot, aromatic, and perfectly seasoned before moving to the final step.
🍽️ Step 5: Finish with Fresh Elements
Remove the wok from heat and stir in the 0.5 cup chopped kimchi and 0.25 cup chopped fresh Thai basil. Drizzle with 1 tablespoon Thai chili paste and toss gently to distribute. For the Korean variation, add the kimchi first and let it infuse for 1 minute off heat. For the Thai version, stir in the basil and chili paste at the very end to preserve its bright flavors.
Garnish with the reserved green onion whites for color contrast and the green onion greens for freshness. Serve immediately while still hot, with extra sesame seeds sprinkled on top if desired. The contrast of textures—crispy chicken, tender rice, bright peas, and fresh herbs—makes this dish truly exceptional. Each bite should deliver a perfect balance of savory, umami, and aromatic complexity.
Pro Tips For Making Chicken Fried Rice Recipe List
- STIR-FRY IN BATCHES: Don’t dump everything in at once—cook the chicken first in a single layer over medium-high heat until it’s fully done and slightly browned. Then set it aside before adding rice and eggs. I learned this the hard way after ending up with steamed chicken and soggy rice because the pan got overcrowded.
- USE COLD RICE: Chill your day-old rice in the fridge for at least 30 minutes before using—it’ll crisp up better when stir-fried. If you’re in a rush, spread it on a tray and pop it in the freezer for 10 minutes. Cold rice also prevents the pan from steaming like a sad, limp cloud.
- SCRAMBLE EGGS FAST: Crack the eggs into a separate bowl first, then scramble them in the same pan you used for the chicken—just wipe it out quickly with a paper towel. The residual heat will cook them faster, and they’ll pick up the garlic and onion flavors already in the pan. (Yes, even if you’re impatient like me.)
- GARNISH WITH GREEN ONIONS LAST: Save the green onions for the very end—toss them in just as you plate the rice. If you add them earlier, they’ll turn into sad, wilted confetti. For extra flavor, sprinkle a pinch of salt over them right before serving. (Your future self will notice the difference.)
Essential equipment for this recipe
Wok Essentials
Your wok is the heart of fried rice—carbon steel or cast iron woks are ideal for achieving that signature wok hei (breath of the wok). I swear by a 14-inch carbon steel wok from Made In—it heats up fast and retains heat beautifully.
For beginners, a non-stick skillet works in a pinch, but it won’t give you the same smoky aroma. Season your new wok with flaxseed oil for a natural non-stick surface and deeper flavor development. 🔥
Need a budget option? A heavy-bottomed stainless steel skillet (like All-Clad) handles high heat well and distributes it evenly. Just remember—these don’t conduct heat as quickly as carbon steel, so you’ll need to monitor the temperature more closely.
Avoid thin, flimsy pans—they’ll warp under high heat and ruin your texture.
High-Heat Tools
A long-handled spatula (I use Victorinox 10-inch) is non-negotiable for stirring and tossing ingredients without burning yourself. The angled head helps scrape up every last bit of flavor from the wok’s surface.
Pair it with a heat-resistant silicone spatula for delicate ingredients like peas or fresh herbs. For precise control, a tong (like OXO Good Grips) helps flip chicken pieces without breaking them apart.
Don’t forget a fine-mesh strainer for rinsing rice if needed—OXO Good Grips makes a sturdy one that won’t bend under hot water. And a microplane (like Mikasa) is perfect for mincing garlic and ginger quickly while keeping your hands safe from burns.
These tools make all the difference when you’re working at high speeds.
Seasoning and Storage
Keep your wok in top shape with a wok brush (I recommend Made In’s with natural bristles) to clean off stubborn bits after cooking. Store it oiled and dry—rub a thin layer of neutral oil (like avocado or grapeseed) on the surface before stacking.
This prevents rust and keeps it ready for your next stir-fry. For the rest of your tools, a wooden block (like OXO’s) keeps knives and spatulas organized and protected.
Pro tip: Invest in a digital instant-read thermometer (like ThermoWorks Smoke) to monitor your wok’s heat—aim for 450-500°F for that perfect sear. And a small bowl (preferably stainless steel) for beaten eggs keeps them from sticking to your counter while you cook.
These small upgrades turn fried rice from a guess into a guaranteed success every time. ✨
Nutrition facts
Frequently asked questions
Why does my fried rice always turn out mushy?
Mushy fried rice happens when the grains absorb too much moisture. Always use day-old, cold rice—it's drier and absorbs less oil. Spread the rice on a tray to cool after cooking, then refrigerate overnight. When stir-frying, cook the rice over high heat for 2-3 minutes until it's hot but still slightly firm, not crispy. Too much soy sauce or adding ingredients too early can also make it soggy.
Can I make fried rice with fresh rice instead of day-old?
Fresh rice works in a pinch, but the texture won't be as good. If you must use it, spread the freshly cooked rice on a tray and refrigerate for at least 1 hour to dry it out. For best results, cook extra rice the night before specifically for fried rice. The starches have time to convert, giving you that perfect separate-grain texture. Pro tip: Rinse the rice before cooking to remove excess surface starch.
What's the difference between stir-fried rice and fried rice?
Stir-fried rice is cooked quickly over high heat with minimal oil, focusing on fresh ingredients and wok hei. Fried rice uses more oil and lower heat, creating crispy edges and a deeper fried flavor. For this recipe list, we're making fried rice—look for those crispy bits around the chicken and edges. The key is cooking the rice in stages: first stir-fry to dry it out, then add the protein and sauces at the end to lock in moisture.
How do I prevent my chicken from drying out?
Cut chicken into 1-inch cubes for even cooking, and sear them until golden brown before adding to the rice. Use a meat thermometer to check for 165°F internal temperature. The secret is removing chicken when it's just cooked through, then finishing it in the wok with the rice. For extra moisture, marinate chicken in 1 tbsp soy sauce and 1 tsp cornstarch for 15 minutes before cooking. This creates a flavorful crust that locks in juices.
Can I make these recipes vegetarian?
Replace chicken with 1 cup cubed tofu (pressed and pan-fried) or 1.5 cups diced tempeh (marinated in soy sauce). For protein depth, add 1 cup cooked edamame or 1 cup shredded rotisserie chicken (if you want to keep it omnivore-friendly). Boost umami with 1 tbsp nutritional yeast or 1 tsp mushroom powder when seasoning. The Thai basil version works especially well with tofu—just increase the chili paste to 2 tbsp for extra flavor.